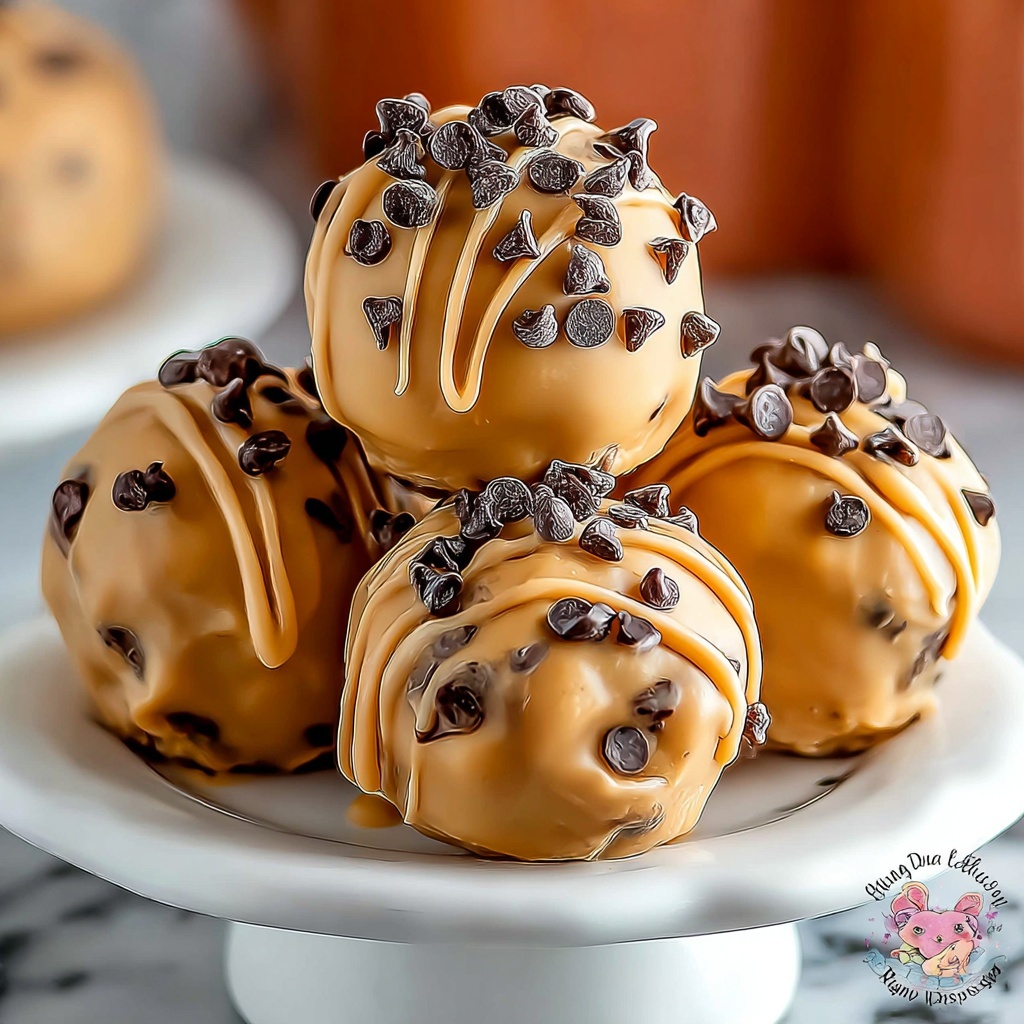
If you’re craving a cool, creamy, and protein-packed snack, you absolutely have to try these Frozen Greek Yogurt Peanut Butter Bites: The Ultimate 7-Step Recipe. They’re a delightful blend of tangy Greek yogurt and rich peanut butter, sweetened just right with honey and a hint of vanilla. What makes them so irresistible? The mini chocolate chips that add a burst of chocolatey goodness in every bite, combined with a luscious texture thanks to a touch of melted coconut oil. These little frozen treats are perfect for a healthy dessert, an energizing snack, or simply a guilt-free indulgence on a warm day. Let me take you through everything you need to know to make these scrumptious bites your new favorite go-to treat.
Ingredients You’ll Need
These ingredients are straightforward but mighty in flavor and texture, coming together to create a snack that’s creamy, sweet, and delightfully chewy with just the right crunch of chocolate.
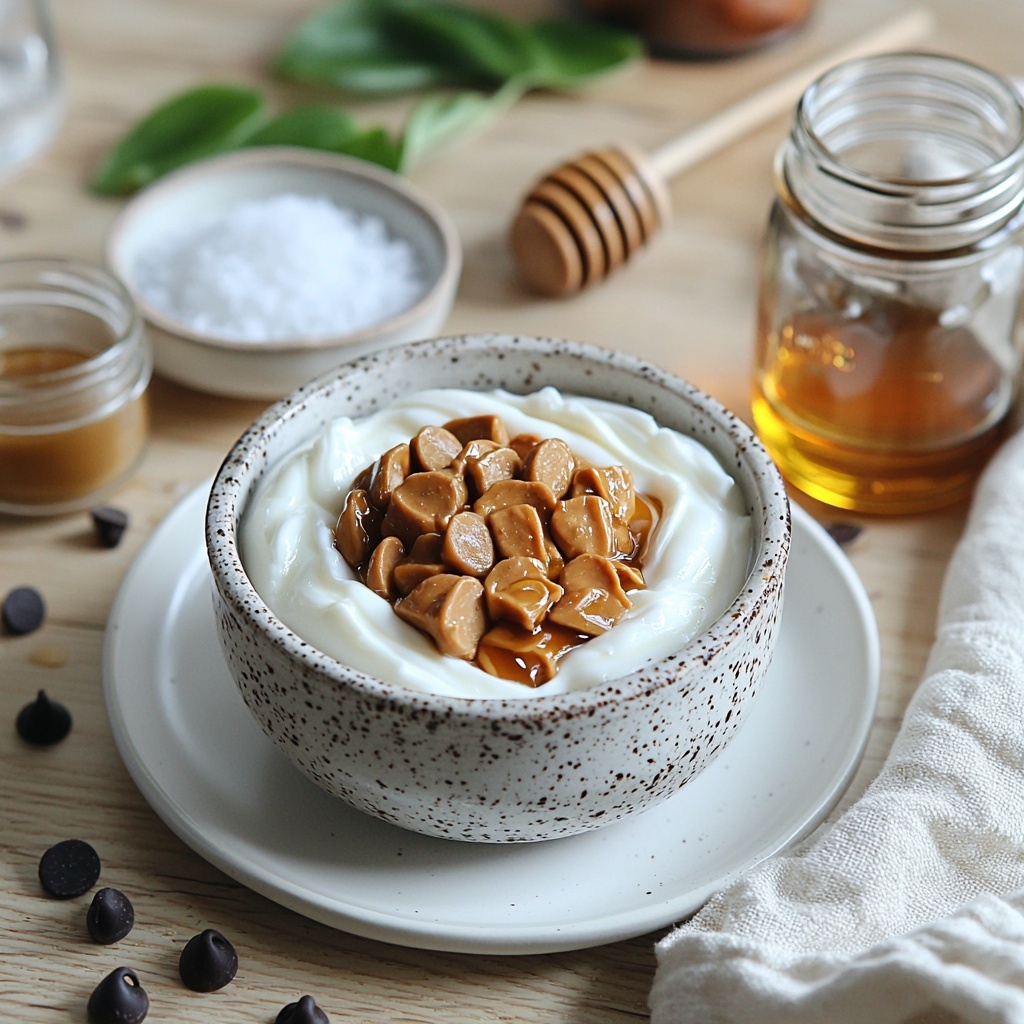
- 1 cup plain Greek yogurt: The creamy, tangy base that packs protein and richness.
- 1/2 cup creamy peanut butter: Adds a nutty depth and smooth texture that pairs perfectly with the yogurt.
- 2 tablespoons honey or maple syrup: Natural sweetness to balance the tartness of the yogurt.
- 1/2 teaspoon pure vanilla extract: Enhances flavor with warm, aromatic notes.
- 1/8 teaspoon salt: A pinch to elevate all the other flavors.
- 1/2 cup mini chocolate chips: For little bursts of chocolate that make every bite special.
- 1 tablespoon coconut oil, melted: Helps create a smooth texture and prevents the bites from sticking together once frozen.
How to Make Frozen Greek Yogurt Peanut Butter Bites: The Ultimate 7-Step Recipe
Step 1: Prepare Your Baking Sheet
Start by lining a baking sheet with parchment paper. This simple step will make sure your peanut butter bites don’t stick and are easy to transfer after freezing. It’s a small prep move that saves a lot of hassle later!
Step 2: Mix the Base Ingredients
In a medium bowl, give together Greek yogurt, creamy peanut butter, honey (or maple syrup), vanilla extract, and salt until smooth and fully incorporated. This creamy mixture is the foundation of your bites, blending tanginess, nuttiness, and a touch of sweetness.
Step 3: Fold in the Chocolate Chips
Add half of your mini chocolate chips to the mixture and fold them in gently. This way, the chocolate pieces are evenly distributed, giving each bite a little surprise of chocoholic delight inside.
Step 4: Portion and Shape
Using a small cookie scoop or a tablespoon, drop rounded spoonfuls of the mixture onto your lined baking sheet, leaving a little space between each mound. Then gently flatten each mound into a bite-sized round—this makes them easier to enjoy and freeze evenly.
Step 5: Add More Chocolate Chips on Top
Sprinkle the remaining mini chocolate chips over each flattened bite, pressing them lightly into the surface. This adds a lovely layered look and extra bursts of chocolate goodness in every mouthful.
Step 6: Drizzle Coconut Oil
Lightly drizzle the melted coconut oil over the tops of the bites. This small but important step will help the surface set smoothly and also prevent the bites from sticking together once frozen.
Step 7: Freeze Until Firm
Pop the baking sheet into the freezer for 1 to 2 hours, or until the bites are completely firm. Once frozen, transfer them to an airtight container and keep stored in the freezer until you’re ready to treat yourself.
How to Serve Frozen Greek Yogurt Peanut Butter Bites: The Ultimate 7-Step Recipe
Garnishes
Want to give your bites an extra pop? Sprinkle some crushed peanuts or shredded coconut on top right before freezing for added texture. Alternatively, a dusting of cocoa powder or a drizzle of dark chocolate can make these little treats feel even more decadent.
Side Dishes
These bites pair wonderfully with fresh fruit like sliced strawberries, banana, or apple. For a more substantial snack, enjoy them alongside a glass of cold milk or a cup of your favorite herbal tea to balance the richness.
Creative Ways to Present
Serve these Frozen Greek Yogurt Peanut Butter Bites on a colorful dessert platter with mint leaves for a fresh touch. You can also thread them on small skewers interspersed with grapes or berries for a fun party presentation that guests will love.
Make Ahead and Storage
Storing Leftovers
If you happen to have leftover bites (which is totally possible!), store them in an airtight container in the freezer. They’ll keep their creamy texture and fresh flavor reliably for up to 3 to 4 days, making them easy to enjoy anytime.
Freezing
These bites are designed to be frozen, so you can prepare them ahead of time without worries. Once frozen solid, transferring them to a sealed container or freezer bag will ensure they stay fresh and ready to snack on whenever you like.
Reheating
Reheating isn’t necessary or recommended for these bites since their magic lies in their frozen state. However, letting them sit at room temperature for 2 to 3 minutes before eating will soften them slightly, making their creamy texture truly delightful.
FAQs
Can I use flavored yogurt instead of plain Greek yogurt?
Absolutely! Using vanilla or honey-flavored Greek yogurt can add a sweeter dimension to your bites. Just adjust the added honey or maple syrup to suit your taste.
What if I’m allergic to peanuts?
No problem at all! You can swap the peanut butter for almond or cashew butter, which works just as well and offers a different but equally luscious flavor.
How long do the frozen bites last in the freezer?
They stay fresh and delicious for up to 3 to 4 days when stored properly in an airtight container. It’s best to enjoy them within this timeframe for the best texture and flavor.
Can I make these bites vegan?
Yes! Use dairy-free Greek-style yogurt and replace honey with maple syrup to keep this recipe vegan-friendly without sacrificing taste.
Are these bites suitable for kids?
Definitely! They’re a kid-friendly, homemade snack that is both nutritious and delicious. Just keep an eye on portion sizes due to the nut butter and chocolate chips.
Final Thoughts
There’s something so satisfying about whipping up a batch of Frozen Greek Yogurt Peanut Butter Bites: The Ultimate 7-Step Recipe. They’re not just tasty but wonderfully wholesome, combining natural sweetness, creamy textures, and a fun chocolatey crunch. Don’t wait for the perfect occasion — make these simple bites today and treat yourself to a snack that feels just as indulgent as it is nourishing. Trust me, these little frozen delights are destined to become a staple in your snack rotation!
Print
Frozen Greek Yogurt Peanut Butter Bites: The Ultimate 7-Step Recipe
- Prep Time: 10 minutes
- Cook Time: 0 minutes
- Total Time: 1 hour 30 minutes
- Yield: 12 bites
- Category: Dessert
- Method: No-Cook
- Cuisine: American
- Diet: Gluten Free
Description
These Frozen Greek Yogurt Peanut Butter Bites are a delicious and healthy no-bake dessert treat. Combining creamy peanut butter, tangy Greek yogurt, and mini chocolate chips, these bite-sized snacks are quick to prepare and perfect for freezing. They offer a high-protein, gluten-free option for a sweet, guilt-free indulgence that’s great for kids and adults alike.
Ingredients
Main Ingredients
- 1 cup plain Greek yogurt
- 1/2 cup creamy peanut butter
- 2 tablespoons honey or maple syrup
- 1/2 teaspoon pure vanilla extract
- 1/8 teaspoon salt
- 1/2 cup mini chocolate chips
- 1 tablespoon coconut oil, melted
Instructions
- Prepare the Baking Sheet: Line a baking sheet with parchment paper to prevent sticking and make transferring easier once frozen.
- Mix the Base Ingredients: In a medium bowl, thoroughly stir together the Greek yogurt, creamy peanut butter, honey or maple syrup, vanilla extract, and salt until you obtain a smooth, fully combined mixture.
- Add Chocolate Chips: Fold in half of the mini chocolate chips gently to distribute them evenly throughout the yogurt mixture.
- Portion the Mixture: Using a small cookie scoop or a tablespoon, drop rounded spoonfuls of the mixture onto the prepared baking sheet, spacing them slightly to avoid sticking together.
- Shape the Bites: Gently flatten each mound into a bite-sized round shape to ensure even freezing and easy snacking.
- Add Toppings: Sprinkle the remaining chocolate chips on top of each bite, pressing them lightly in for a decorative and tasty finish. Then, drizzle the melted coconut oil over the tops to provide a smoother texture after freezing.
- Freeze Until Firm: Place the baking sheet in the freezer for 1 to 2 hours, or until the bites are completely firm. Once set, transfer the frozen bites into an airtight container and keep stored in the freezer until ready to enjoy.
Notes
- For a sweeter treat, use vanilla Greek yogurt instead of plain Greek yogurt.
- Almond butter or cashew butter can be used as substitutes for peanut butter if desired.
- Allow the bites to sit at room temperature for 2 to 3 minutes before eating to enjoy the best creamy texture.

