
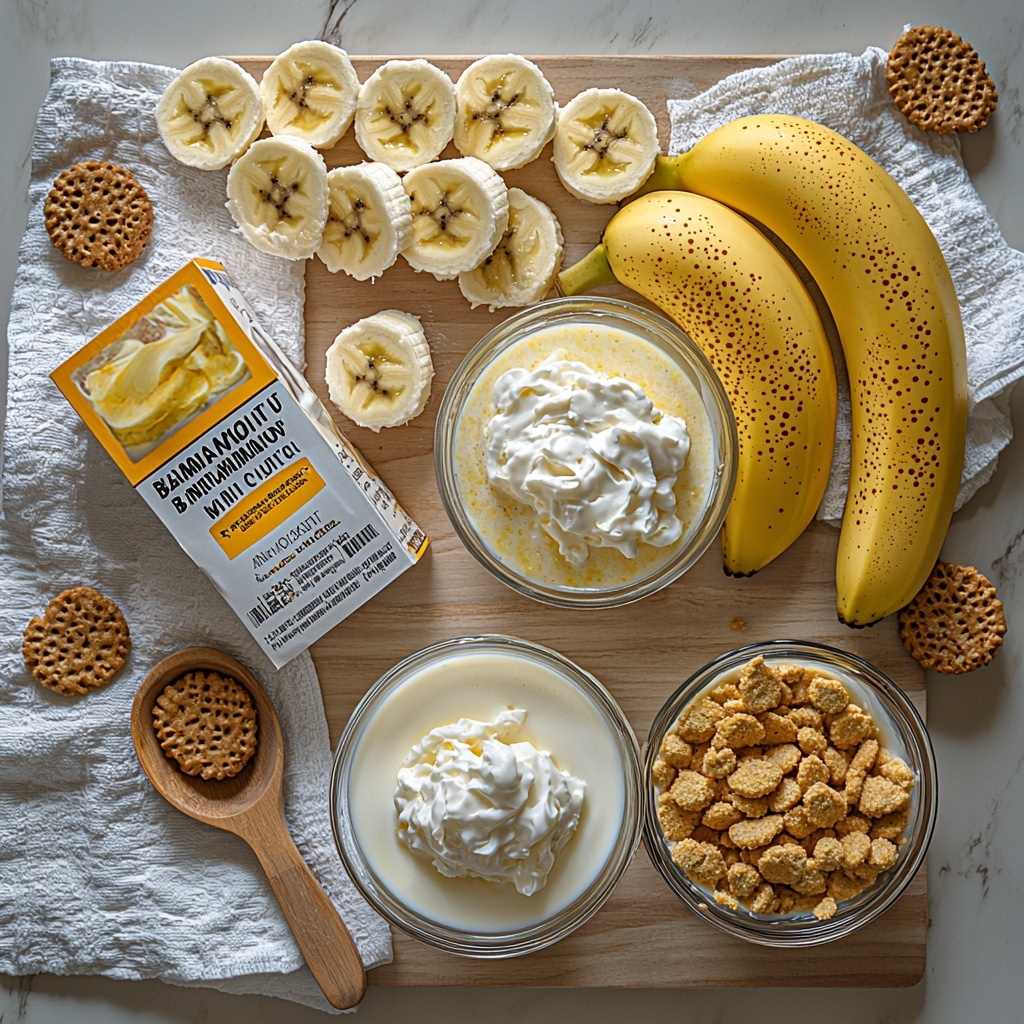
If you love a dessert that perfectly balances creamy sweetness with a delightful crunch, you are going to adore this Banana Pudding Cups Recipe. It’s a nostalgic treat reimagined into adorable individual servings that make sharing or enjoying solo effortlessly charming. The layers of smooth vanilla pudding, fresh bananas, and crumbly vanilla wafers come together in a way that’s both comforting and absolutely irresistible—trust me, once you try this, it will quickly become one of your favorites to whip up for family and friends.
Ingredients You’ll Need
These ingredients are simple, everyday pantry staples that transform into a luscious, crowd-pleasing dessert. Each component plays a crucial role—from the creamy texture of the pudding to the fresh, fruity touch of the bananas and the satisfying crunch of the vanilla wafers, every bite has that perfect harmony.
- 1 box (3.4 oz) instant vanilla pudding mix: The creamy base that sets quickly and tastes rich and smooth.
- 2 cups cold milk: Needed to whisk with the pudding mix for the perfect silky texture.
- 1 cup whipped topping (e.g., Cool Whip): Adds airiness and lightness to the pudding, making it fluffy and dreamy.
- 2 ripe bananas, sliced: Freshness and natural sweetness that brighten each spoonful.
- 1 cup crushed vanilla wafers (plus extra for garnish): Adds a delightful crunch and a hint of vanilla that complements the pudding beautifully.
- Whole vanilla wafers (for garnish): A charming finishing touch that makes each cup look picture-perfect.
How to Make Banana Pudding Cups Recipe
Step 1: Prepare the pudding
Start by whisking the instant vanilla pudding mix with the cold milk in a medium bowl until the mixture is fully smooth and thickening begins. Refrigerate it for about 5 minutes so it sets up nicely before you fold in other ingredients.
Step 2: Fold in whipped topping
Now, gently fold the whipped topping into the chilled pudding using a spatula. This step is key to achieving that light, creamy texture everyone loves—don’t rush it, and be sure to keep it airy and smooth.
Step 3: Assemble the cups
Grab your individual serving cups and start layering with a base of crushed vanilla wafers. Add a few slices of banana on top of the wafers, then spoon a layer of the creamy pudding mixture over them. Repeat these layers until the cups are full.
Step 4: Top and garnish
Finish off each cup with a generous dollop of whipped topping, a sprinkle of crushed vanilla wafers for crunch, and a whole vanilla wafer placed upright for a whimsical, inviting look.
Step 5: Chill
Pop the assembled cups in the refrigerator for at least 30 minutes. This chilling allows all the flavors to meld deliciously and the textures to come together perfectly before you dive in.
How to Serve Banana Pudding Cups Recipe
Garnishes
While the classic finish of whipped topping and vanilla wafers is timeless, feel free to add a sprinkle of cinnamon or a drizzle of caramel sauce for an extra layer of flavor. Fresh mint leaves can brighten the appearance and add a subtle freshness as well.
Side Dishes
This dessert shines on its own but pairs beautifully with light, fresh sides such as a crisp green salad or a plate of fresh berries. These contrasts keep the palate refreshed and the meal balanced.
Creative Ways to Present
Try serving your Banana Pudding Cups Recipe in clear mason jars or colorful glassware so the beautiful, layered look steals the show. You can also line the cups with banana slices pressed along the sides for a pretty visual twist that guests will love.
Make Ahead and Storage
Storing Leftovers
Store any leftover pudding cups in airtight containers in the refrigerator. They stay fresh and delicious for up to 3-4 days, making them the perfect make-ahead dessert for busy days or casual entertaining.
Freezing
This dessert is best enjoyed fresh or chilled rather than frozen, as freezing can affect the texture of the pudding and whipped topping. For the best experience, avoid freezing and serve within the recommended storage time.
Reheating
Because Banana Pudding Cups Recipe is a chilled dessert, reheating is not recommended. Serve cold straight from the fridge to enjoy the full creamy texture and fresh flavors.
FAQs
Can I use fresh whipped cream instead of whipped topping?
Absolutely! Fresh whipped cream adds a wonderful homemade touch and can make the dessert even more luscious. Just be sure to fold it in gently so the pudding stays light and airy.
How ripe should the bananas be?
For the best flavor and texture, use bananas that are ripe but still firm. Overripe bananas might become too mushy in the layers, while underripe bananas won’t add as much sweetness.
Can I make this dessert vegan?
Yes! Use a plant-based vanilla pudding mix (or make your own with non-dairy milk and cornstarch), dairy-free whipped topping, and ensure vanilla wafers are vegan-friendly. The bananas and wafers add natural sweetness and flavor that everyone will enjoy.
Is it necessary to chill the pudding before folding in whipped topping?
Refrigerating the pudding for at least 5 minutes helps it set up properly, which makes folding in the whipped topping easier and helps the texture stay fluffy and smooth.
How long can I prepare Banana Pudding Cups Recipe in advance?
You can assemble the cups in advance and refrigerate them for up to 3-4 days. Just add the final garnishes like whole wafers or extra whipped topping right before serving for the best presentation.
Final Thoughts
This Banana Pudding Cups Recipe is one of those timeless desserts that feels like a warm hug in every bite. It’s easy to make, fun to serve, and always a crowd-pleaser. Whether it’s a family dinner, a picnic, or just a sweet treat to brighten your day, these pudding cups are sure to bring smiles all around. Give it a go—you won’t regret it!
Print
Banana Pudding Cups Recipe
- Prep Time: 10 minutes
- Cook Time: 0 minutes
- Total Time: 40 minutes
- Yield: 6 servings
- Category: Dessert
- Method: No-Cook
- Cuisine: American
Description
Delight in these easy and creamy Banana Pudding Cups, a classic Southern dessert featuring layers of smooth vanilla pudding, fresh banana slices, and crunchy vanilla wafers, all topped with a fluffy whipped topping. Perfect for a quick, no-bake treat that can be made ahead and chilled for enhanced flavor.
Ingredients
Pudding Base
- 1 box (3.4 oz) instant vanilla pudding mix
- 2 cups cold milk
Mix-ins and Toppings
- 1 cup whipped topping (e.g., Cool Whip)
- 2 ripe bananas, sliced
- 1 cup crushed vanilla wafers (plus extra for garnish)
- Whole vanilla wafers (for garnish)
Instructions
- Prepare the pudding: In a bowl, whisk together the instant vanilla pudding mix and cold milk until smooth and well blended. Place the mixture in the refrigerator for about 5 minutes to allow it to set and thicken properly.
- Fold in whipped topping: Gently fold the whipped topping into the chilled pudding mixture, being careful not to deflate the light texture, to create a creamy and airy pudding base.
- Assemble the cups: In individual serving cups, start by adding a layer of crushed vanilla wafers, then add a layer of sliced bananas, followed by the creamy pudding mixture. Repeat the layers until each cup is filled to the desired level.
- Top and garnish: Finish each cup with a dollop of whipped topping on top. Sprinkle some extra crushed vanilla wafers over the whipped topping and place a whole vanilla wafer as a final decorative touch.
- Chill: Refrigerate the assembled cups for at least 30 minutes. This chilling time allows the flavors to meld and the wafers to soften slightly, enhancing the dessert’s texture and taste.
Notes
- Use ripe bananas for natural sweetness and optimal texture.
- For a gluten-free version, substitute gluten-free vanilla wafers.
- If preferred, homemade whipped cream can replace store-bought whipped topping.
- The dessert can be assembled several hours ahead of time, making it perfect for entertaining.
- To keep bananas from browning, toss slices briefly in lemon juice before layering.
