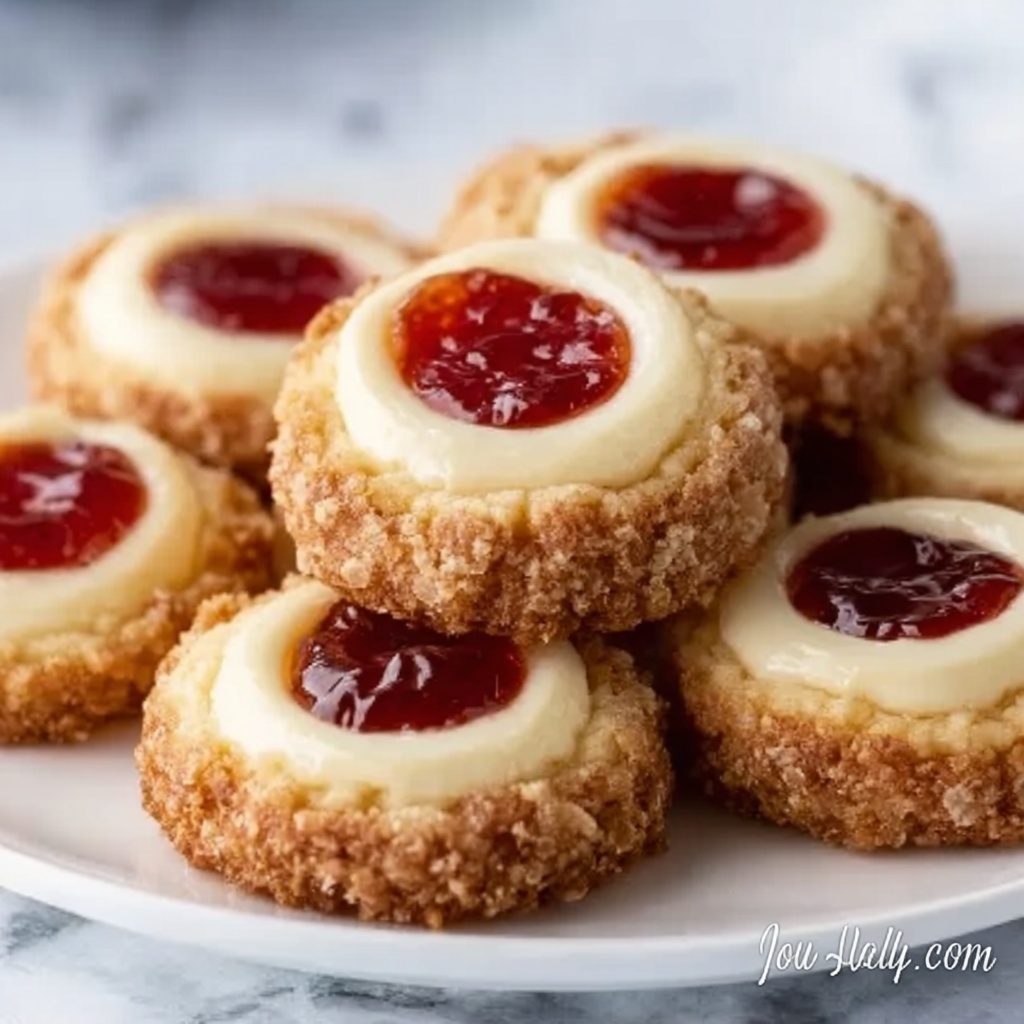
If you have a sweet tooth and a love for creamy, crumbly delights, you are absolutely going to adore this Mouthwatering Cheesecake Thumbprint Cookies Recipe. These cookies combine the buttery richness of a classic thumbprint cookie with a luscious cheesecake filling and a burst of fruity jam, creating a treat that’s both comforting and elegant. Each bite delivers a perfect balance of soft cookie texture, tangy cream cheese, and sweet berry notes that will have you reaching for just one more. Trust me, once you try making these, they’ll quickly become a cherished favorite you’ll want to share with everyone you know.
Ingredients You’ll Need
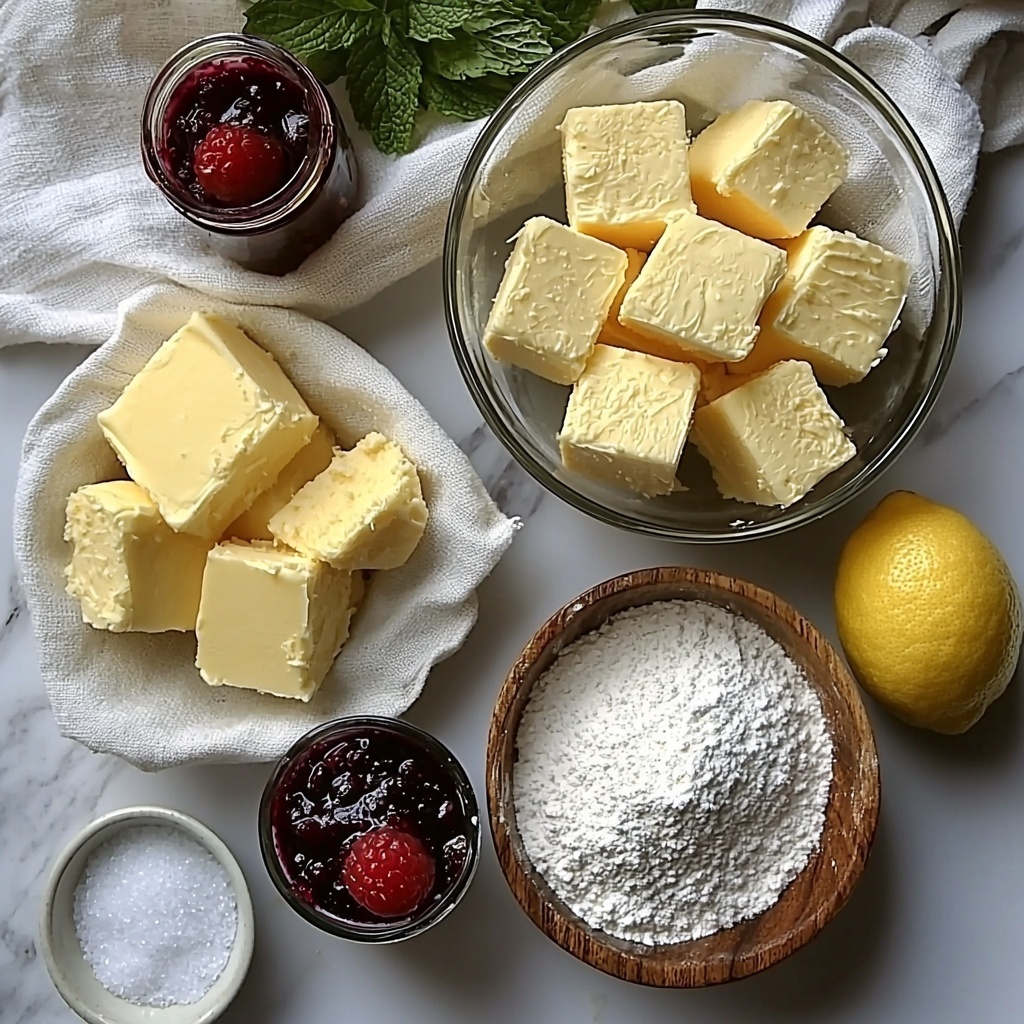
These ingredients are simple yet essential, each adding a special touch to make these cookies irresistibly tender, flavorful, and beautifully balanced. From creamy butter to fresh lemon zest, every element contributes to the cookie’s perfect taste and texture.
- 1 cup unsalted butter, softened: Provides richness and a tender crumb to the cookie base.
- 1/2 cup granulated sugar: Adds necessary sweetness and helps with cookie structure.
- 1/4 cup light brown sugar, packed: Gives a subtle molasses flavor and moisture.
- 2 large egg yolks, room temperature: Create a silky texture and help bind ingredients.
- 2 teaspoons vanilla extract: Brings warmth and depth to the flavors.
- 2 1/2 cups all-purpose flour: The sturdy base that holds the cookie together.
- 1/2 teaspoon fine salt: Enhances the sweetness and balances the flavors.
- 6 ounces cream cheese, softened (brick style, full-fat): Essential for that creamy, tangy cheesecake filling.
- 1/3 cup powdered sugar: Sweetens the cheesecake filling delicately without grittiness.
- 1 large egg yolk, room temperature: Gives the cheesecake layer richness and smoothness.
- 1 teaspoon vanilla extract: Infuses the cheesecake filling with inviting flavor.
- 1 teaspoon fresh lemon juice or 1/2 teaspoon lemon zest: Adds a fresh tang that brightens the filling.
- 1/3 cup raspberry, strawberry, or mixed berry jam (or pie filling): Topping that brings natural sweetness and color contrast.
How to Make Mouthwatering Cheesecake Thumbprint Cookies Recipe
Step 1: Cream the butter and sugars
Start by lining two baking sheets with parchment paper to prep for baking. In a large bowl, beat the softened butter, granulated sugar, and light brown sugar together on medium speed for about 2 to 3 minutes. You want it light, creamy, and slightly fluffy—that’s the secret to tender cookies.
Step 2: Mix in egg yolks and vanilla
Add the two large egg yolks and vanilla extract to your butter-sugar mixture. Beat everything together thoroughly, making sure to scrape down the bowl’s sides so the mixture is smooth and uniform. This step enriches the dough and brings out a warm aroma.
Step 3: Combine dry ingredients
In another bowl, whisk the flour and salt. With your mixer on low speed, gradually add this dry mixture to the wet ingredients and mix just until a soft, thick dough forms. Avoid overmixing to keep your cookies tender and light.
Step 4: Shape the dough balls
Scoop the dough with a tablespoon measure and roll each portion between your palms into smooth balls. Arrange them spaced on your baking sheets. Creating uniform balls ensures even baking and a beautiful cookie shape.
Step 5: Chill the dough
Place the baking sheets with dough balls into the refrigerator for at least 30 minutes or up to 2 hours. This chilling step is crucial because it firms the dough, helping your cookies maintain their shape during baking.
Step 6: Prepare the cheesecake filling
While the dough chills, whip up the cheesecake filling by beating together the softened cream cheese and powdered sugar until silky smooth. Incorporate the egg yolk, vanilla extract, and lemon juice or zest, then beat until thick and luscious. This filling is the star that melts in your mouth.
Step 7: Create thumbprints in the dough
Preheat your oven to 350°F (175°C). Remove one baking sheet of dough from the fridge. Use your thumb or the back of a small measuring spoon to gently press a well in the center of each dough ball. If the edges crack, no worries—simply smooth them gently with your fingers.
Step 8: Fill the thumbprints with cheesecake
Spoon or pipe the cheesecake mixture into each indentation, filling it near the top without overflowing. This creates a creamy center that contrasts beautifully with the cookie.
Step 9: Add jam topping
Place a tiny dollop of your chosen berry jam or pie filling atop each cheesecake center. For a pretty marbled effect, use a toothpick to gently swirl the jam into the cream cheese layer. This adds a burst of color and a sweet-tart zing.
Step 10: Bake the cookies
Bake one sheet at a time for 11 to 13 minutes, until the cookie edges turn lightly golden and the cheesecake filling sets but does not brown. The centers will look slightly soft — don’t worry, they firm up as they cool.
Step 11: Cool the cookies
Remove the cookies from the oven and let them cool on the baking sheet for five minutes. Then carefully transfer them to a wire rack to cool completely. This resting period helps the cheesecake centers solidify just right.
Step 12: Serve or store
Your Mouthwatering Cheesecake Thumbprint Cookies Recipe is ready to enjoy! If desired, add an extra tiny swirl of jam before serving for flair. Store leftovers in an airtight container in the refrigerator, and when you’re ready to eat some, let them come to room temperature for 15 to 20 minutes for the best texture.
How to Serve Mouthwatering Cheesecake Thumbprint Cookies Recipe
Garnishes
Enhance these delightful cookies by adding a light dusting of powdered sugar or a fresh mint leaf on top. Adding a little citrus zest sprinkle right before serving can also brighten up the flavors and make each bite feel even more special.
Side Dishes
These cookies pair wonderfully with a hot cup of tea, a steamy espresso, or a glass of cold milk. For a more indulgent spread, serve them alongside fresh berries or a small bowl of whipped cream to complement their creamy centers.
Creative Ways to Present
Arrange your cookies on a beautiful platter with a sprinkling of fresh berries and edible flowers for festive occasions. For parties, consider packaging them in little cellophane bags tied with a ribbon, making them charming handmade gifts that everyone will cherish.
Make Ahead and Storage
Storing Leftovers
Once cooled, keep your cookies in an airtight container in the refrigerator to retain their freshness and texture. Stored properly, they will stay deliciously good for 3 to 4 days. Remember to bring them back to room temperature before serving for the best experience.
Freezing
You can freeze the dough balls before baking or freeze fully baked cookies. For dough, chill and wrap tightly in plastic wrap then place in an airtight container or freezer bag for up to one month. Baked cookies freeze well in a sealed container also for about one month. Thaw overnight in the fridge or at room temperature before enjoying.
Reheating
If you prefer your cheesecake thumbprint cookies slightly warm, pop them in a preheated oven at 300°F (150°C) for about 5 minutes. Avoid microwaving to keep the cookie texture crisp and cheesecake center intact.
FAQs
Can I use low-fat cream cheese for the filling?
Full-fat cream cheese is recommended because it provides the best creamy texture and flavor. Low-fat versions may make the filling less smooth and affect the overall richness of the cookies.
What other jams can I use besides berry flavors?
While berry jams are classic, you can experiment with apricot, peach, or even fig jam for different flavor profiles that pair wonderfully with the tangy cheesecake filling.
How do I prevent the dough from cracking when making thumbprints?
Chilling the dough well before pressing the thumbprints helps a lot. If cracks appear, gently smooth the edges back with your fingers and avoid pressing too hard when creating the wells.
Can I make these cookies gluten-free?
Yes, by substituting the all-purpose flour with a gluten-free flour blend that measures 1:1, you can make these cookies gluten-free. Just be mindful the texture might be slightly different but still delicious.
How long do these cookies last at room temperature?
Because of the cream cheese filling, it’s best not to leave these cookies out at room temperature for more than 2 hours to ensure food safety and freshness.
Final Thoughts
There’s something truly joyful about baking and sharing this Mouthwatering Cheesecake Thumbprint Cookies Recipe. They’re a lovely balance of buttery cookies, rich cheesecake filling, and fruity sweetness that’s perfect anytime you want a special treat. Give it a try—you might just discover your new go-to cookie that wins hearts with every bite!
Print
Mouthwatering Cheesecake Thumbprint Cookies Recipe
- Prep Time: 20 minutes
- Cook Time: 13 minutes
- Total Time: 1 hour 5 minutes
- Yield: 24 cookies
- Category: Dessert – Cookies
- Method: Baking
- Cuisine: American
Description
These Mouthwatering Cheesecake Thumbprint Cookies combine a tender, buttery cookie base with a luscious cheesecake filling and a sweet burst of berry jam. Perfectly balanced with creamy, tangy, and fruity flavors, these cookies are a delightful treat for any occasion.
Ingredients
Cookie Dough
- 1 cup unsalted butter, softened
- 1/2 cup granulated sugar
- 1/4 cup light brown sugar, packed
- 2 large egg yolks, room temperature
- 2 teaspoons vanilla extract
- 2 1/2 cups all-purpose flour
- 1/2 teaspoon fine salt
Cheesecake Filling
- 6 ounces cream cheese, softened (brick style, full-fat)
- 1/3 cup powdered sugar
- 1 large egg yolk, room temperature
- 1 teaspoon vanilla extract
- 1 teaspoon fresh lemon juice or 1/2 teaspoon lemon zest
Topping
- 1/3 cup raspberry, strawberry, or mixed berry jam (or pie filling)
Instructions
- Prepare the baking sheets: Line two baking sheets with parchment paper and set aside to prevent sticking and ensure even baking.
- Make the cookie dough: In a large mixing bowl, beat the softened butter with granulated sugar and light brown sugar on medium speed until light, creamy, and slightly fluffy, about 2 to 3 minutes, creating a smooth base for the dough.
- Add egg yolks and vanilla: Beat in the two egg yolks and vanilla extract until fully combined, scraping down the bowl to ensure even mixing.
- Combine dry ingredients: In a separate bowl, whisk together the all-purpose flour and salt, then gradually add this mixture to the wet ingredients on low speed, mixing just until a soft, thick dough forms; avoid overmixing to maintain a tender texture.
- Form dough balls: Scoop 1-tablespoon portions of dough and roll each between your palms into smooth balls. Place them on prepared baking sheets with space between them for spreading.
- Chill the dough: Refrigerate the dough balls for at least 30 minutes to 2 hours until firm to the touch, which helps the cookies keep their shape during baking.
- Make the cheesecake filling: Beat softened cream cheese and powdered sugar together until smooth and creamy. Add one egg yolk, vanilla extract, and lemon juice or zest, and beat until thick, silky, and well combined.
- Preheat oven and create thumbprints: Preheat oven to 350°F (175°C). Remove one tray of dough from the fridge. Using your thumb or back of a 1/2-teaspoon measuring spoon, gently press a well into each dough ball’s center, smoothing any cracks carefully.
- Fill with cheesecake mixture: Spoon or pipe a small amount of cheesecake filling into each thumbprint well, filling it nearly to the top without overflowing.
- Add jam topping: Place a dollop of your chosen berry jam on top of each cheesecake filling. Optionally, use a toothpick to swirl the jam gently into the cheesecake for a marbled effect.
- Bake the cookies: Bake one sheet at a time for 11 to 13 minutes until the edges are lightly golden and the cheesecake filling is set but not browned. Centers will still look slightly soft.
- Cool the cookies: Let the cookies cool on baking sheets for 5 minutes before transferring to a wire rack to cool completely, allowing the cheesecake centers to firm up.
- Serve and store: Serve cooled cookies as-is or garnish with an extra tiny swirl of jam. Store leftovers airtight in the refrigerator and bring to room temperature for 15 to 20 minutes before enjoying.
Notes
- Chilling the dough is essential to keep the cookies from spreading too much during baking.
- Use full-fat brick-style cream cheese for best texture and flavor in the cheesecake filling.
- You can substitute the jam with your favorite fruit preserves or pie filling.
- If the dough cracks when making thumbprints, gently smooth the edges with your fingers to maintain shape.
- Leftover cookies store well in the refrigerator for up to a week.
- Bring chilling cookies to room temperature before serving for optimal flavor and softness.


