
“`html
If you’re searching for a delightfully colorful and refreshingly fun dessert to brighten up your spring celebrations, look no further than this Easter Jello-O Pie Recipe. It’s a charming blend of creamy whipped layers and vibrant Jell-O colors nestled in a buttery graham cracker crust. Each bite feels like a joyful celebration, perfect for sharing with family and friends during Easter or any gathering that calls for a little extra cheer.
Ingredients You’ll Need
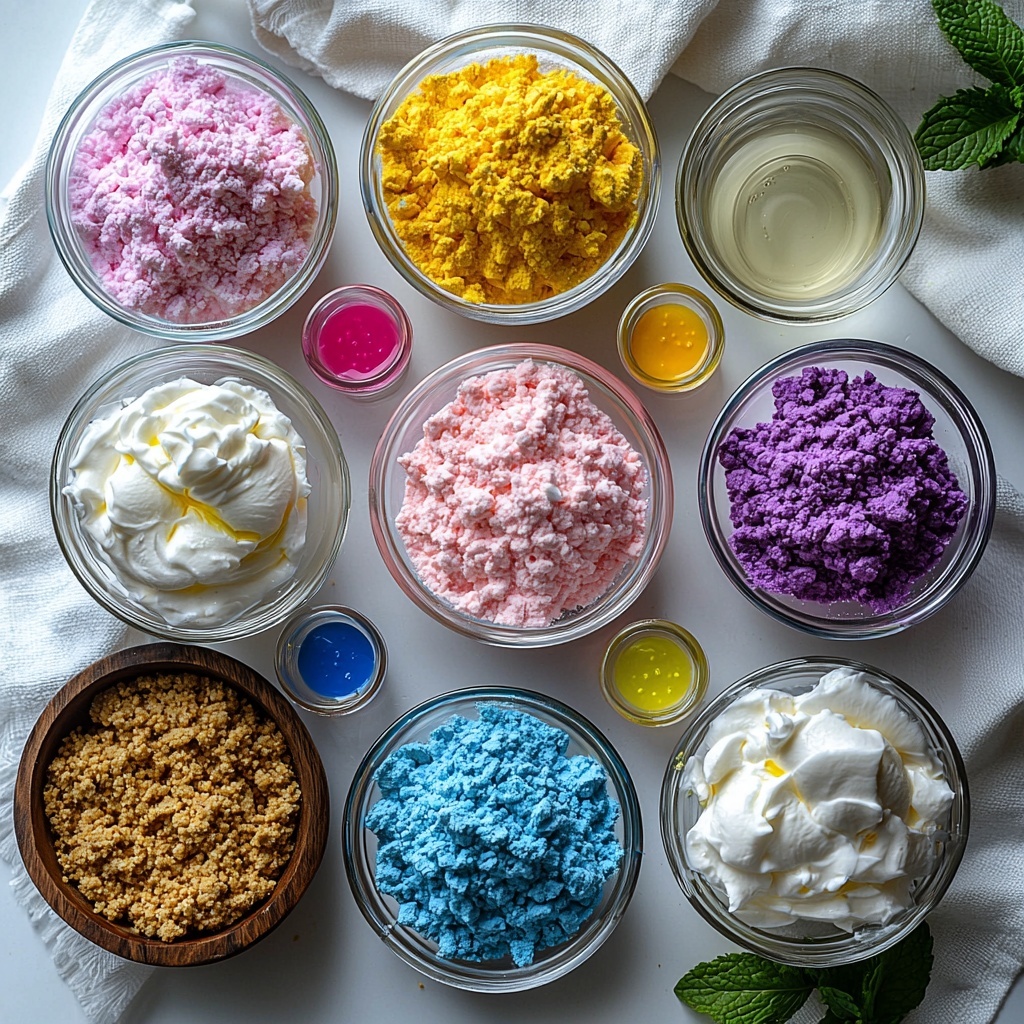
Simple ingredients come together in this Easter Jello-O Pie Recipe to create a show-stopping dessert. Each component plays an important role—from the rich crust to the silky Jell-O layers blended with fluffy whipped cream, making each slice a textural delight.
- ½ package Pink Starburst Jell-O (a little under 2 ounces): Adds a sweet, fruity pink layer that’s both nostalgic and vibrant.
- 1½ ounces Blue Jell-O (½ Package): Provides a bold, refreshing pop of blue color, contrasting beautifully with the other layers.
- 1½ ounces Yellow Jell-O (½ Package): Brings sunshine to the pie with its bright, cheerful hue and tangy flavor.
- 1½ ounces Purple Jell-O (½ Package): Balances the color spectrum and adds depth with its rich flavor.
- 16 ounces Whipped Cream (divided): Offers a light, creamy texture that transforms the Jell-O into a luscious mousse.
- 3 cups Boiling Water: Essential for dissolving the Jell-O powders fully for smooth layers.
- 1⅓ cup Cold Water (divided): Cools the Jell-O to the perfect thickness before mixing with whipped cream.
- Yellow Food Dye (optional): Enhances the vibrancy of your yellow layer for extra visual appeal.
- Pink Food Dye (optional): Intensifies the pink layer for a richer, more enticing look.
- 2½ cups Graham Cracker Crumbs: Creates a crunchy, buttery base that complements the creamy filling.
- 12 tbsp Butter (1 ½ sticks): Binds the graham crackers for a sturdy, flavorful crust.
How to Make Easter Jello-O Pie Recipe
Step 1: Prepare the Crust
Start by melting your butter in the microwave until it’s fully liquified. This is the glue that holds your graham cracker crust together. Mix the melted butter with the graham cracker crumbs in a bowl until the texture resembles damp sand—this ensures a well-packed, flavorful crust. Press this crumb mixture firmly along the bottom and up the sides of a springform pan. Chilling the crust in the freezer solidifies it so it can hold all those luscious Jell-O layers.
Step 2: Mix Each Jell-O Layer
Divide your Jell-O powders into four small bowls—one for each color. Add ¾ cup boiling water to each bowl and stir thoroughly until the powders dissolve completely with no graininess. Then, add ⅓ cup cold water to each and stir again. Pop these bowls in the fridge for about 20-30 minutes; you’re aiming for a thickened but not set consistency—this step is crucial to getting that perfect mousse texture.
Step 3: Combine Jell-O with Whipped Cream
Once the Jell-O mixtures have thickened, add 4 ounces of whipped cream to each bowl. Beat vigorously until the whipped cream and Jell-O marry into a fluffy, smooth mousse. If you want brighter colors, now’s the time to add a few drops of yellow or pink food dye, mixing until the color is fully blended and vibrant without any streaks.
Step 4: Layer Your Pie
Pour your first mousse layer into the crust—yellow is a great starting choice, though feel free to personalize your order. Spread evenly and pop the pie back into the freezer for 5 minutes to set slightly. Repeat the process for each color, layering and chilling between each addition to create distinct, beautiful stripes. This careful layering is what makes the Easter Jello-O Pie Recipe so visually stunning!
Step 5: Chill Until Firm
After adding the final layer, let your pie chill in the freezer for 3 to 4 hours or until solidified all the way through. This resting time allows the flavors to meld and the texture to firm up perfectly.
Step 6: Add Finishing Touches
Before serving, top your pie with extra whipped cream for a cloud-like finish that complements the fruity layers beneath. This final touch makes each slice not just a feast for the eyes but also a creamy, dreamy indulgence.
How to Serve Easter Jello-O Pie Recipe
Garnishes
A dollop of fresh whipped cream on each slice is a classic choice, but you can get creative! Fresh berries, mint leaves, or a sprinkle of edible glitter add playful sophistication and fresh flavors that brighten the entire dessert experience.
Side Dishes
This light and airy pie pairs beautifully with a cup of hot coffee or tea to balance its sweetness. For a fuller springtime spread, serve alongside a crisp fruit salad or tangy lemon bars to offer contrasting flavors that keep the palate excited.
Creative Ways to Present
Instead of one big pie, try making individual Jello-O mousse parfaits using small clear cups layered with graham cracker crumbs and mousse. This Easter Jello-O Pie Recipe also looks fantastic topped with colorful sprinkles or shaped with festive silicone molds to match your holiday décor.
Make Ahead and Storage
Storing Leftovers
Once made, you can store leftover Easter Jello-O Pie in the refrigerator for 3 to 4 days. Keep it covered tightly with plastic wrap or in an airtight container to maintain freshness and prevent the crust from becoming soggy.
Freezing
While freezing is possible, it can affect the texture of the whipped cream and Jell-O layers, causing them to become watery or grainy once thawed. For best results, enjoy this pie within the first few days of preparation.
Reheating
This dessert is best enjoyed cold and should not be reheated. Let any chilled leftovers come to room temperature for a few minutes before serving to enjoy the perfect texture and flavor.
FAQs
Can I use different flavors of Jell-O for this pie?
Absolutely! The Easter Jello-O Pie Recipe is very versatile. You can swap out any flavor to suit your taste or the occasion. Just keep the same quantities to maintain perfect layers.
Is it necessary to chill the Jell-O mixture before adding whipped cream?
Yes, chilling the Jell-O until thickened helps it combine smoothly with whipped cream, creating the light mousse texture rather than a runny mix.
Can I make the crust without butter?
Butter is key to achieving a firm, flavorful crust, but you might substitute with coconut oil for a dairy-free option. The texture may vary slightly, so press firmly when forming the crust.
What if I don’t have a springform pan?
You can use any pie dish or removable-bottom pan, but a springform pan makes it much easier to preserve the neat edges of the layered dessert.
Can I prepare this pie a day ahead?
Definitely! The Easter Jello-O Pie Recipe actually benefits from sitting overnight, allowing the layers to set fully and flavors to meld beautifully.
Final Thoughts
There is something truly magical about the Easter Jello-O Pie Recipe—a dazzling combination of colors, creamy textures, and nostalgic flavors that is sure to become a seasonal favorite. Whether you’re sharing it with family, friends, or bringing it to a potluck, this pie delivers both smiles and deliciousness. Go ahead, give it a whirl and watch how it lights up your dessert table!
“`
Print
Easter Jello-O Pie Recipe
- Prep Time: 20 minutes
- Cook Time: 0 minutes
- Total Time: 4 hours 20 minutes
- Yield: 8 servings
- Category: Dessert
- Method: No-Cook
- Cuisine: American
Description
This vibrant Easter Jello-O Pie is a colorful layered dessert featuring four bright and fruity Jell-O flavors combined with creamy whipped topping for a light and refreshing treat. A buttery graham cracker crust holds the rainbow layers together, making it a perfect no-bake dessert for holiday celebrations or anytime you want a fun and festive sweet dish.
Ingredients
Jell-O Layers
- ½ package Pink Starburst Jell-O (a little under 2 ounces)
- 1½ ounces Blue Jell-O (½ package)
- 1½ ounces Yellow Jell-O (½ package)
- 1½ ounces Purple Jell-O (½ package)
- 3 cups Boiling Water (divided: ¾ cup per Jell-O bowl)
- 1⅓ cup Cold Water (divided: ⅓ cup per Jell-O bowl)
- 16 ounces Whipped Cream (divided: 4 ounces per Jell-O bowl)
- Yellow Food Dye (optional)
- Pink Food Dye (optional)
Crust
- 2½ cups Graham Cracker Crumbs
- 12 tbsp Butter (1 ½ sticks), melted
Instructions
- Melt Butter: Melt your butter in the microwave until it’s fully liquified and set aside.
- Make Graham Cracker Crust: Combine the graham cracker crumbs and melted butter in a medium bowl. Mix until the texture is thick and sandy.
- Press Crust into Pan: Transfer the crust mixture into a springform pan. Evenly spread it along the bottom and press up the sides firmly to create an even crust layer.
- Chill Crust: Place the crust in the freezer to set while preparing the Jell-O layers.
- Prepare Jell-O Mixtures: Divide each Jell-O powder into four separate small bowls. Add ¾ cup boiling water to each bowl and stir well until no granules remain.
- Add Cold Water: Stir ⅓ cup cold water into each bowl of dissolved Jell-O.
- Thicken Jell-O: Refrigerate the bowls for 20-30 minutes until the gelatin thickens but is not fully set.
- Mix with Whipped Cream: Add 4 ounces of whipped cream to each thickened Jell-O bowl. Stir vigorously until fully blended and smooth, about a minute per bowl.
- Add Food Coloring (Optional): If desired, add yellow or pink food dye to the respective Jell-O mixtures and stir until well combined and the colors are vibrant.
- Layer Jell-O: Pour the first Jell-O color (yellow recommended) over the crust and spread evenly. Freeze the pie for 5 minutes to set this layer before adding the next.
- Repeat for Remaining Layers: Continue layering each remaining Jell-O color on top of the last, freezing for 5 minutes between layers to ensure they set without mixing.
- Final Chill: After all layers are added, keep the pie in the freezer for 3-4 hours or until completely solidified through.
- Serve: Top with additional whipped cream, if desired. Slice and enjoy your colorful Easter Jello-O Pie!
Notes
- Be careful not to let the Jell-O layers fully set before mixing with whipped cream to ensure a smooth texture.
- The optional food coloring helps enhance the yellow and pink layers for a brighter appearance but can be omitted if preferred.
- Using a springform pan makes it easier to remove the delicate pie without damaging the layers.
- Freeze time between layers is important to prevent colors from bleeding into each other.
- This pie can be stored in the refrigerator if you prefer a softer texture instead of frozen.
- For a dairy-free version, replace whipped cream with coconut whipped topping.


