
If you’ve ever wanted to create a silky, flavorful, and naturally creamy milk alternative right in your own kitchen, the House Blend Homemade Nut Milk Recipe is exactly what you need. This delightful blend of raw cashews and almonds whips up quickly, delivering a rich, smooth nut milk that elevates everything from your morning coffee to your favorite smoothie. Lightly salted to enhance the nutty depths, this recipe balances simplicity with sophisticated taste, making it a go-to staple for anyone craving a wholesome, dairy-free option.
Ingredients You’ll Need
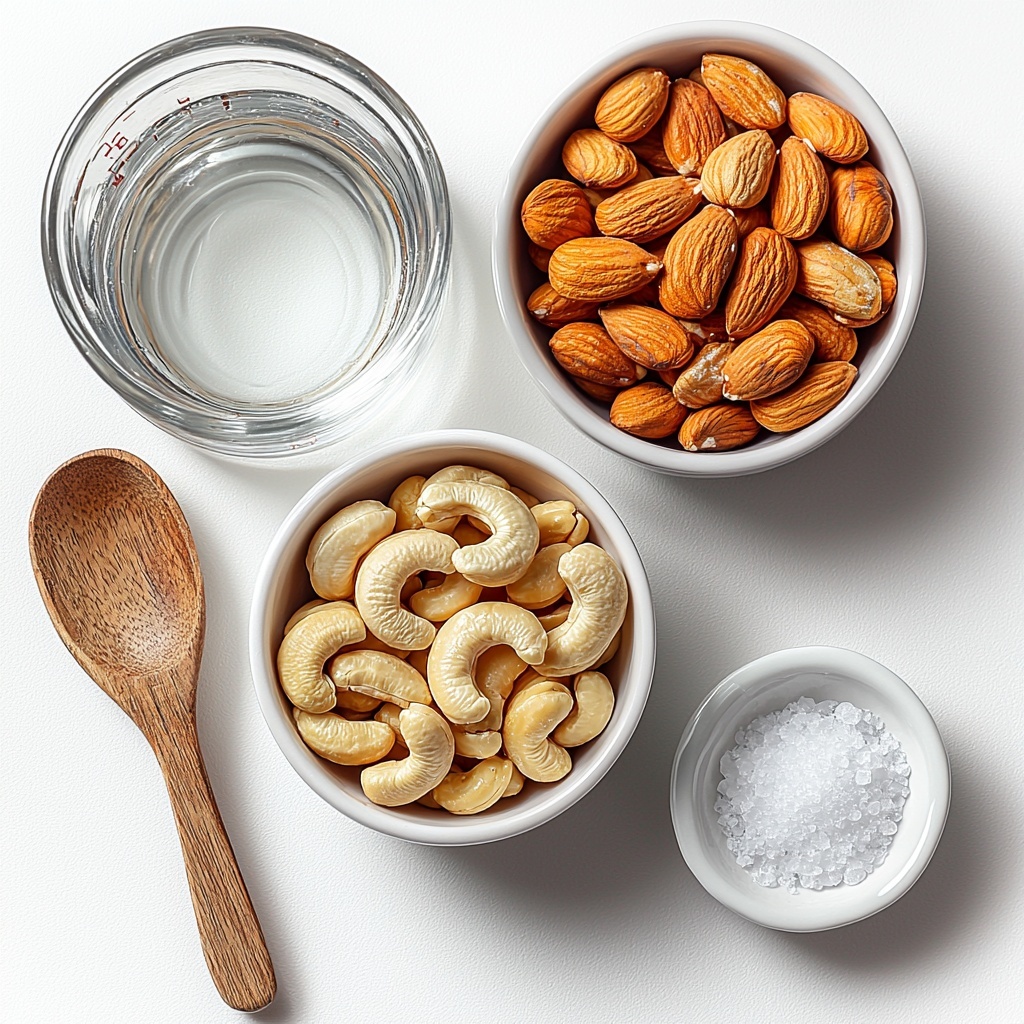
Gathering the right ingredients is the first step toward making the perfect nut milk, and this recipe keeps it refreshingly simple. Each component plays a vital role—fresh nuts for creaminess, water for the smooth texture, and just a pinch of salt to awaken the flavors and bring everything together.
- 4 cups (930 g) water: The base of your milk, water ensures a smooth blend perfect for sipping or cooking.
- 1 cup (120 g) raw unsalted cashews: Cashews are naturally creamy, giving this milk its luxuriously silky texture.
- 1/2 cup (85 g) raw unsalted almonds: Almonds add a subtle nutty flavor and a little body for a richer taste experience.
- 1/4 tsp Diamond Crystal kosher salt: A sprinkle of salt enhances the natural nut flavors and balances the overall taste.
How to Make House Blend Homemade Nut Milk Recipe
Step 1: Combine Ingredients in the Blender
Start by adding your raw cashews, almonds, water, and kosher salt directly into a high-speed blender. Using fresh, unsalted nuts is key here because it allows the natural creaminess and flavor to shine through without any unwanted additives. I personally love using my trusty Vitamix A2300, which has been a kitchen staple for over a decade—its power ensures the perfect smoothness every time.
Step 2: Blend to Creamy Perfection
Begin blending on a low speed and gradually increase to high, allowing the nuts to fully break down and release their creamy goodness. About two minutes of blending is all it takes to achieve that luscious, velvety texture that makes this nut milk so special. Patience at this stage is crucial because you want to make sure there are no gritty bits left behind, just silky smooth milk.
Step 3: Strain the Nut Milk
Pour the blended mixture through a nut milk bag to separate the smooth liquid from the leftover nut pulp. This step guarantees a silky finish without any texture interruptions, perfect for drinking straight or using in recipes that call for a smooth milk substitute. Once strained, pour the milk into a glass container to keep it fresh and ready for use.
How to Serve House Blend Homemade Nut Milk Recipe
Garnishes
To elevate your serving experience, try garnishing a glass of this homemade nut milk with a sprinkle of cinnamon or nutmeg for warmth, or a few cacao nibs for a subtle crunch. These small touches can enhance the natural nuttiness and add a comforting aroma, making each sip feel like a little luxury.
Side Dishes
Pair this nut milk with freshly baked muffins, a bowl of warm oatmeal, or granola topped with fresh fruit. Its mild flavor complements a wide variety of breakfast staples and afternoon snacks, creating a nourishing and satisfying start or mid-day boost.
Creative Ways to Present
For a fun twist, blend the House Blend Homemade Nut Milk Recipe with your favorite fresh or frozen berries to create a creamy smoothie, or use it as a base for dairy-free hot chocolate by warming it gently and mixing in some dark chocolate. You can also pour it over your favorite cereal or chia pudding for an instant upgrade.
Make Ahead and Storage
Storing Leftovers
Keep any extra nut milk stored in a sealed glass container in the refrigerator. It typically stays fresh for up to one week, offering plenty of time to enjoy it chilled or warmed. Give it a good shake before each use, as natural separation is normal but can be simply remedied by mixing.
Freezing
If you want to keep the nut milk longer, freezing is an option, though it may change the texture slightly. Freeze in ice cube trays for portion-controlled servings perfect for smoothies or recipes. Once thawed, blend gently to improve consistency before using.
Reheating
When warming the nut milk, do so gently on the stove over low heat to prevent curdling or separating. Stir continuously and avoid boiling to maintain that smooth, creamy texture you love. Warm nut milk is especially comforting when sipped on its own or added to your favorite hot beverages.
FAQs
Can I use other nuts besides cashews and almonds in this recipe?
Absolutely! While cashews and almonds offer a perfect balance of creaminess and flavor, you can experiment with walnuts, macadamias, or even hazelnuts. Just keep in mind that each nut brings its own flavor profile and consistency, so you might need to adjust water quantities or blending times slightly.
Do I need to soak the nuts before blending?
For this particular House Blend Homemade Nut Milk Recipe, soaking is not required due to the power of a high-speed blender, which makes blending raw nuts quick and easy. However, soaking overnight can yield an even creamier milk and may improve digestibility for some people.
What is the best type of blender to use?
A high-speed blender is ideal for this recipe because it fully breaks down the nuts into a smooth, creamy milk. Models like Vitamix or Blendtec work beautifully, but any powerful blender capable of crushing nuts without overheating will do the job well.
Can I sweeten the nut milk?
Certainly! Adding a little maple syrup, honey, vanilla extract, or dates during the blending process can turn this nut milk into a subtly sweetened treat. Adjust sweetness to your preference, but the natural nutty taste is already delicious without additions.
What do I do with the leftover nut pulp?
Don’t throw away that nutritious pulp! You can dehydrate it to use as a flour substitute, add it to smoothies for extra fiber, mix it into baked goods, or even spread it on toast as a nutty topping. It’s a wonderful way to reduce waste and add wholesome texture to other meals.
Final Thoughts
This House Blend Homemade Nut Milk Recipe is truly a kitchen gem that brings healthy, creamy goodness to your everyday routine without any fuss. It’s quick, simple, and incredibly versatile, making it a perfect addition to breakfast, snacks, and even cooking adventures. I hope you enjoy making this nourishing nut milk as much as I do—there’s something so satisfying about crafting your own fresh milk, and once you try it, it just might become your new favorite as well!
Print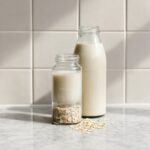
House Blend Homemade Nut Milk Recipe
- Prep Time: 3 minutes
- Cook Time: 2 minutes
- Total Time: 5 minutes
- Yield: 4 servings
- Category: Beverage
- Method: Blending
- Cuisine: Vegan
- Diet: Vegan
Description
This House Blend Homemade Nut Milk is a creamy, dairy-free alternative made from raw unsalted cashews and almonds blended with water and a pinch of kosher salt. Perfect for those seeking a fresh, preservative-free nut milk that’s easy to prepare and stores well in the refrigerator for up to a week.
Ingredients
Nut Milk Ingredients
- 4 cups (930 g) water
- 1 cup (120 g) raw unsalted cashews
- 1/2 cup (85 g) raw unsalted almonds
- 1/4 tsp Diamond Crystal kosher salt
Instructions
- Combine Ingredients: Add the cashews, almonds, water, and kosher salt to a high-speed blender. For best results, use a powerful blender like a Vitamix to ensure a smooth texture.
- Blend Nuts and Water: Start blending on low speed and slowly increase to high. Blend for about 2 minutes or until the mixture is very creamy and smooth.
- Strain the Milk: Pour the blended mixture through a nut milk bag to strain out the nut pulp, ensuring the milk is silky and free of grit.
- Store Properly: Transfer the strained nut milk into a glass container and refrigerate. Consume within 1 week for optimal freshness and flavor.
Notes
- Use raw unsalted nuts to avoid any unwanted flavors or added salt.
- Adjust the water amount to achieve desired creaminess—less water for thicker milk, more for thinner.
- The leftover nut pulp can be dried and used in baking or smoothies.
- Shake well before each use as natural separation may occur.
- Store the nut milk in an airtight glass container in the refrigerator.


