
There is nothing quite like biting into a warm, golden pocket filled with juicy ground beef, melted cheddar cheese, and a burst of classic cheeseburger flavors. This Cheeseburger Hot Pockets Recipe is an absolute game-changer when you want handheld comfort food that feels indulgent but comes together effortlessly. With a flaky crust enveloping savory, cheesy goodness seasoned perfectly with mustard and Worcestershire sauce, these hot pockets are sure to become your go-to for cozy dinners, lunchbox surprises, or casual get-togethers with friends.
Ingredients You’ll Need
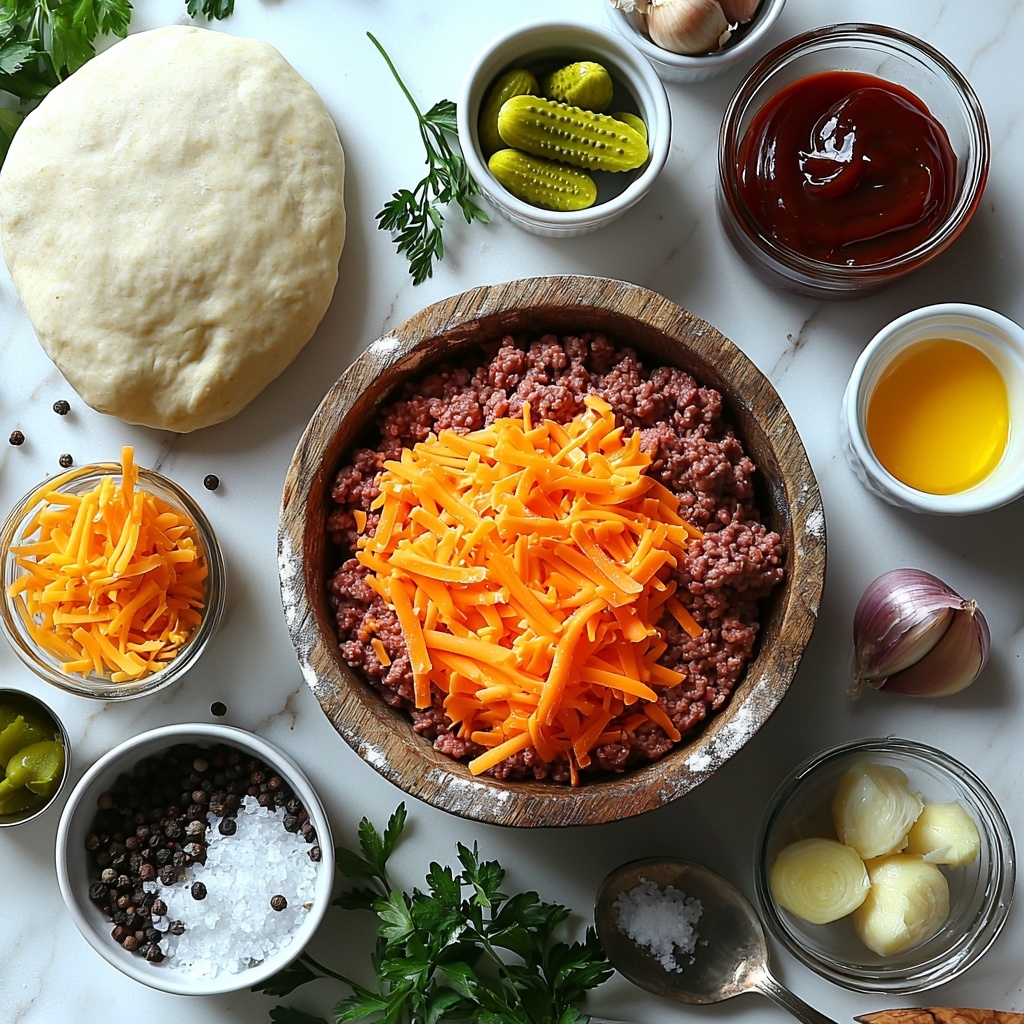
Getting ready to make these irresistible cheeseburger hot pockets? You’ll find that the ingredients are simple, yet each one plays a vital role in building layers of flavor and texture that make this dish so memorable. From savory ground beef to the sharpness of cheddar and the buttery crust, everything combines to create an unforgettable bite.
- 1 pound ground beef: The hearty base for the filling, providing rich and juicy flavor.
- 1 small onion, diced: Adds sweetness and depth when sautéed with the beef.
- 2 cloves garlic, minced: Brings aromatic warmth that wakes up the palate.
- 1 cup shredded cheddar cheese: Melts to gooey perfection, adding tangy richness.
- 1 teaspoon salt: Enhances all the natural flavors in the filling.
- 1 teaspoon black pepper: Offers a subtle spicy kick to balance the richness.
- 1 teaspoon mustard: Injects a slight tang and sharpness reminiscent of a classic cheeseburger.
- 1 tablespoon Worcestershire sauce: Deepens the savory notes with a hint of umami.
- 1 package refrigerated pie crusts (or biscuit dough if preferred): The golden, flaky exterior that seals in all that delicious filling.
- 1 egg, beaten (for egg wash): Gives the crust a shiny, appetizing golden finish.
- Optional: chopped pickles, ketchup, or mustard for filling: Personalize your pockets with classic cheeseburger condiments.
How to Make Cheeseburger Hot Pockets Recipe
Step 1: Prepare the Filling
Start by heating a large skillet over medium heat and adding the ground beef. Toss in the diced onion and minced garlic to cook alongside the beef until the meat is browned and the onions become translucent—this usually takes around 7 to 10 minutes. This combination creates a beautiful base bursting with flavor.
Step 2: Season the Mixture
Once the beef is perfectly cooked, drain any excess fat from the skillet to avoid greasiness. Then stir in salt, black pepper, mustard, and Worcestershire sauce. These simple seasonings lift the filling with classic cheeseburger notes and bring a wonderful balance. Let the mixture cook together for another two minutes so the flavors meld beautifully before removing it from the heat.
Step 3: Add the Cheese and Optional Extras
Allow the beef mixture to cool slightly, so it won’t melt the cheese too quickly into a greasy puddle. Then stir in the shredded cheddar cheese until it’s all nicely combined. If you’re feeling adventurous, fold in some chopped pickles for that iconic cheeseburger crunch and tang.
Step 4: Prepare the Dough
Roll out the refrigerated pie crust on a lightly floured surface to prevent sticking. Depending on your size preference for each hot pocket, cut the dough into rounds or squares. This step sets the stage for creating perfectly sized pockets that are easy to handle and fun to eat.
Step 5: Assemble the Hot Pockets
Place a generous spoonful of the beef and cheese filling in the center of each dough piece. Carefully fold the dough over the filling to form a pocket. Seal the edges firmly by pinching them or pressing with a fork, ensuring the filling stays inside during baking.
Step 6: Bake to Golden Perfection
Arrange your assembled hot pockets on a baking sheet lined with parchment paper to prevent sticking. Brush the tops with the beaten egg wash; this simple step will give your pockets a gorgeous golden shine. Bake in the preheated oven at 400°F (200°C) for 15 to 20 minutes, or until the crust turns a beautiful golden brown and is cooked through.
Step 7: Let Them Cool Slightly
Once baked, remove the hot pockets from the oven and allow them to cool for a few minutes so the filling can set just enough to avoid molten burns (as delicious as that sometimes can be). Then, dig in and enjoy your homemade cheeseburger delight!
How to Serve Cheeseburger Hot Pockets Recipe
Garnishes
These hot pockets are already packed with flavor but topping them with a little extra flair never hurts! A sprinkle of chopped fresh parsley or chives brings a pop of fresh color and subtle brightness that contrasts beautifully with the rich filling.
Side Dishes
Serve your Cheeseburger Hot Pockets Recipe with classic sides like crispy French fries or a fresh green salad for a well-rounded meal. Coleslaw is another excellent pairing; its crunchy, tangy texture complements the savory pockets perfectly.
Creative Ways to Present
If you want to turn these into a party favorite, slice your hot pockets into bite-sized finger foods served with mini dipping bowls of ketchup, mustard, or even a smoky barbecue sauce. This is a fun, interactive way to share the joy of cheeseburger flavors with friends and family.
Make Ahead and Storage
Storing Leftovers
Leftover hot pockets store wonderfully in an airtight container in the refrigerator for up to three days. Simply pop them back in the oven or microwave right before eating to enjoy their fresh-from-the-oven goodness again.
Freezing
If you want to prepare ahead in bulk, these hot pockets freeze beautifully. Arrange them on a baking sheet in a single layer and freeze until firm, then transfer to a freezer-safe bag or container. They can stay frozen for up to two months without losing any of their delectable cheeseburger magic.
Reheating
For the best texture when reheating, bake frozen or refrigerated hot pockets in a 375°F (190°C) oven until warm and crispy—about 15 minutes from refrigerated and 25-30 minutes if frozen. Avoid microwaving if you prefer a flaky crust that stays crisp rather than soft.
FAQs
Can I use biscuit dough instead of pie crust for the Cheeseburger Hot Pockets Recipe?
Absolutely! Biscuit dough is a great alternative that gives the pockets a thicker, softer crust if you prefer that texture over flaky pie crust. Both work wonderfully.
Can I make these hot pockets ahead of time to bake later?
Yes, you can assemble the hot pockets and keep them refrigerated for a few hours or freeze them. Just bake them fresh when you’re ready, brushing with egg wash right before baking for the best finish.
Are there vegetarian options for this Cheeseburger Hot Pockets Recipe?
Sure! Substitute the ground beef with plant-based crumbles or cooked lentils and add your favorite cheese or vegan cheese for a delicious vegetarian twist.
Can I add other toppings inside the hot pockets?
Of course! Feel free to mix in diced tomatoes, sautéed mushrooms, or even jalapeños to customize the filling to your liking.
What’s the best way to prevent the filling from leaking?
Make sure to seal the edges of the dough very well by pinching or crimping with a fork, and avoid overstuffing the pockets to keep the filling neatly contained as they bake.
Final Thoughts
There’s something so satisfying about homemade comfort food that’s easy to make and packed with flavor, and this Cheeseburger Hot Pockets Recipe hits every mark. Whether you’re feeding the family, packing a fun lunch, or hosting friends, these pockets deliver cheeseburger joy in every bite. Don’t hesitate to try this recipe soon—your taste buds will thank you for the warm, cheesy, savory goodness wrapped in a perfect golden crust.
Print
Cheeseburger Hot Pockets Recipe
- Prep Time: 20 minutes
- Cook Time: 25 minutes
- Total Time: 45 minutes
- Yield: 6 servings
- Category: Main Course
- Method: Baking
- Cuisine: American
Description
These Cheeseburger Hot Pockets are a delicious and comforting handheld meal featuring seasoned ground beef, onion, garlic, and melted cheddar cheese wrapped in flaky pie crust and baked to golden perfection. Quick to prepare and perfect for family dinners or lunchboxes, these hot pockets deliver all the classic cheeseburger flavors in a convenient, portable form.
Ingredients
Filling
- 1 pound ground beef
- 1 small onion, diced
- 2 cloves garlic, minced
- 1 teaspoon salt
- 1 teaspoon black pepper
- 1 teaspoon mustard
- 1 tablespoon Worcestershire sauce
- 1 cup shredded cheddar cheese
- Optional: chopped pickles (to taste)
Dough
- 1 package refrigerated pie crusts (or biscuit dough if preferred)
Finishing
- 1 egg, beaten (for egg wash)
- Optional: ketchup or mustard for serving
Instructions
- Preparation: Preheat your oven to 400°F (200°C) to get it ready for baking the hot pockets.
- Cook the Filling: In a large skillet over medium heat, cook the ground beef alongside the diced onion and minced garlic until the beef is browned and onions are translucent, about 7-10 minutes.
- Season and Combine: Drain any excess fat from the skillet. Stir in salt, black pepper, mustard, and Worcestershire sauce, cooking for an additional 2 minutes to blend the flavors, then remove from heat.
- Add Cheese: Let the meat mixture cool slightly to prevent melting the cheese prematurely, then stir in the shredded cheddar cheese until evenly combined. Mix in chopped pickles if desired.
- Prepare Dough: Roll out the pie crusts on a floured surface to prevent sticking. Cut into your preferred shapes—rounds or squares work well for hot pockets.
- Assemble Hot Pockets: Spoon a generous amount of the cheeseburger filling into the center of each piece of dough.
- Seal: Fold the dough over the filling to form a pocket, sealing the edges securely by pressing with a fork or pinching together to prevent filling leakage during baking.
- Apply Egg Wash: Place the assembled hot pockets on a parchment-lined baking sheet and brush the tops with the beaten egg to encourage a golden-brown finish.
- Bake: Bake in the preheated oven for 15-20 minutes or until the crust turns golden brown and the filling is cooked through.
- Cool and Serve: Remove the hot pockets from the oven, allow them to cool for a few minutes, and serve warm. Offer ketchup or mustard on the side if preferred.
Notes
- You can substitute refrigerated biscuit dough for pie crust if you prefer a softer, bread-like crust.
- Adding chopped pickles to the filling gives a nice tangy contrast, but they are optional depending on your taste.
- Be sure to seal the edges well to avoid filling leakage while baking.
- The egg wash gives the crust a beautiful golden color and slight crispness.
- These can be made ahead and refrigerated or frozen before baking; just add a few extra minutes to the baking time if baking from cold.


