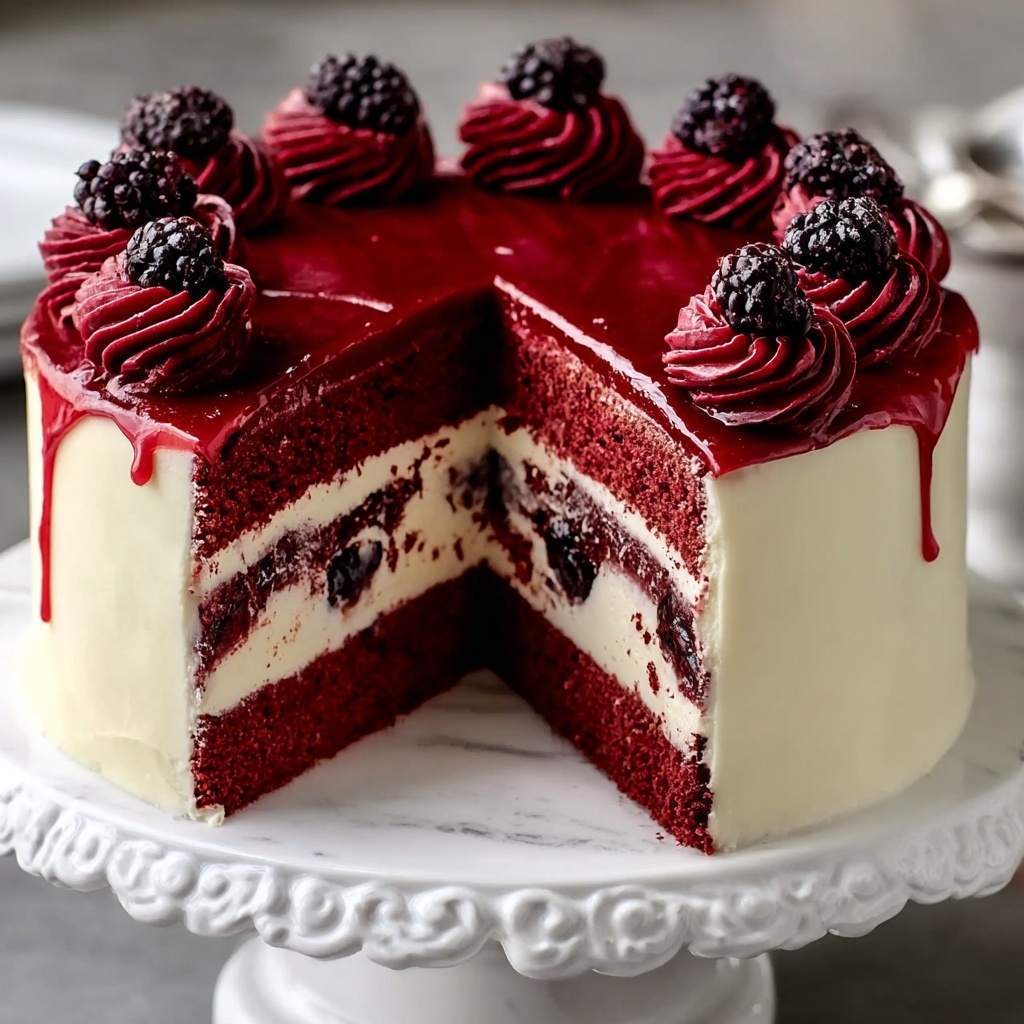
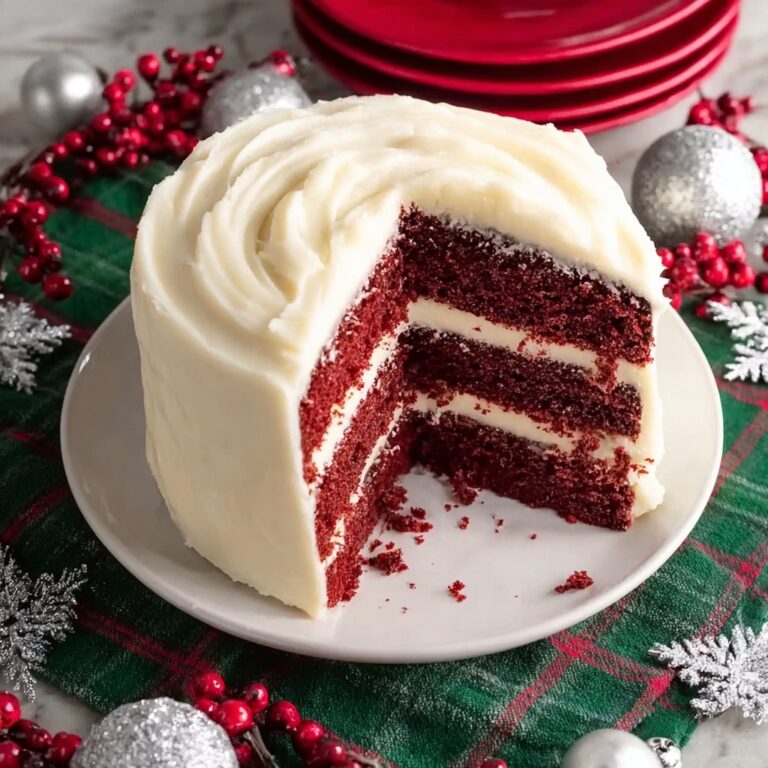
There is nothing quite like the joy of sharing a decadent dessert that not only tastes incredible but also looks stunning on any occasion. The Irresistible Red Velvet Cheesecake Layer Cake to Wow Your Guests Recipe offers that perfect balance of vibrant red velvet cake layers, luscious cheesecake filling, and a delightful mixed berry glaze. This cake is not just a treat for the palate but also a feast for the eyes, making it an absolute showstopper at your next gathering. Whether you’re celebrating a birthday, holiday, or simply craving something special, this recipe is destined to become your new favorite.
Ingredients You’ll Need
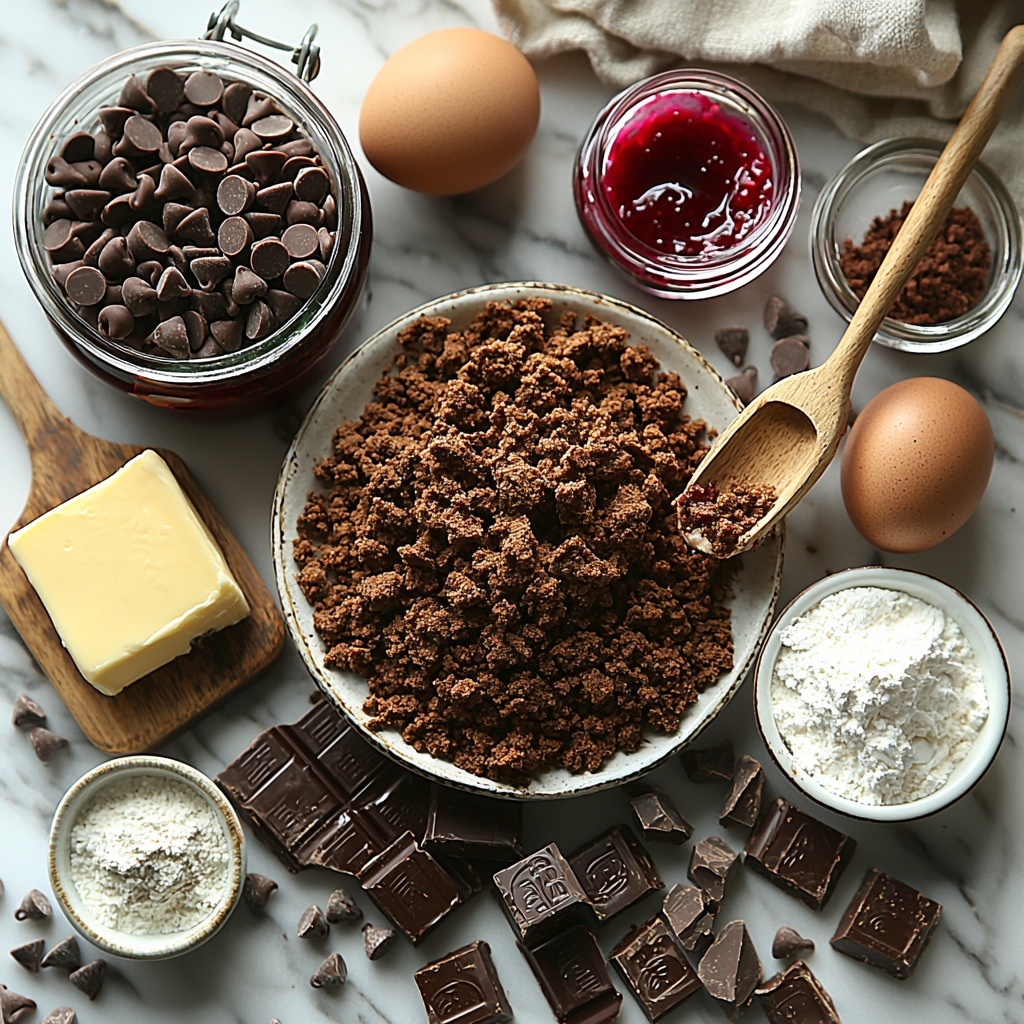
All the components that go into this cake are straightforward pantry staples enhanced by a few special touches that bring the flavors and textures to life. Each ingredient plays an essential role, from the rich cocoa in the red velvet layers to the tangy cream cheese filling and the fruity jam glaze, ensuring your cake is balanced and irresistible.
- Chocolate Cookie Crumbs: These create a crispy, buttery crust base that anchors the cheesecake layer with great flavor and texture.
- Unsalted Butter: Adds richness to the crust and cake, and opting for dairy-free options can adjust this recipe easily for dietary needs.
- All-Purpose Flour: Provides structure and tender crumb to the cake; gluten-free blends work well for sensitive diets.
- Cocoa Powder: Use dark cocoa to deepen the classic red velvet chocolate flavor.
- Baking Soda and Baking Powder: These leavening agents give the cake its perfect lift and softness.
- Salt: Enhances flavor and balances the sweetness beautifully.
- Granulated Sugar: Sweeter notes that caramelize nicely during baking; brown sugar can add extra moisture.
- Vegetable Oil: Keeps the cake moist and tender, while alternatives like melted coconut oil can add a subtle twist.
- Eggs: Traditional binders for structure, but flax eggs or applesauce offer plant-based options.
- Buttermilk: Provides tang and acidity that activate the baking soda, ensuring a light crumb.
- Vinegar: Used to enhance the red velvet color and react with the leaveners.
- Vanilla Extract: A splash of pure vanilla warms and rounds out all the flavors.
- Red Gel Food Coloring: This delivers that signature vibrant red without thinning the batter.
- Cream Cheese: The star of the cheesecake layer — full-fat for maximum creaminess and flavor.
- Sour Cream: Adds tang and velvety texture, with Greek yogurt as a handy substitute.
- Heavy Cream: Whipped into a frosting that’s rich yet fluffy; coconut cream can be used for dairy-free versions.
- Powdered Sugar: Sweetens the frosting to perfection without grit.
- Mixed Berry Jam: Adds a fruity tartness that balances the richness and creates a pretty drizzle on top.
- Dark Chocolate Chips: For a touch of crunch and bittersweet contrast around the edges.
- Red Velvet Crumbs: Decorative crumbs that emphasize the cake’s beautiful red layers and add texture.
How to Make Irresistible Red Velvet Cheesecake Layer Cake to Wow Your Guests Recipe
Step 1: Prepare the Crust
First things first, we start by combining the chocolate cookie crumbs with melted unsalted butter until crumbly and press this mixture firmly into the bottom of a 9-inch springform pan. Baking it briefly at 350°F (175°C) solidifies the crust, creating a delicious, firm base that perfectly supports the creamy cheesecake layer to come. Don’t rush the cooling step after baking; a cool crust is essential to prevent mixing flavors prematurely.
Step 2: Bake the Red Velvet Cake Layers
Preheat the oven again to 350°F (175°C). In one bowl, whisk together the all-purpose flour, cocoa powder, baking soda, baking powder, and salt — these dry ingredients create the foundation of your cake’s fine crumb. In another bowl, mix granulated sugar, vegetable oil, eggs, buttermilk, vinegar, vanilla extract, and that all-important red gel food coloring. Fold the dry ingredients into the wet gently to keep the batter light. Divide the batter evenly between two pans and bake for about 25-30 minutes until a toothpick comes out clean. These vibrant layers need to cool completely before stacking.
Step 3: Make the Cheesecake Layer
Next, we beat 16 ounces of full-fat cream cheese and the powdered sugar together until smooth, creating the luscious base of our cheesecake. Add eggs one at a time to maintain a smooth texture, then mix in vanilla extract and sour cream. Pour this creamy mixture over the cooled cookie crust or into a separate lined pan if you prefer a standalone cheesecake. Bake it gently at 325°F (160°C) for 40-45 minutes until the edges are set but the center still slightly jiggles. Let this rest at room temperature before chilling it thoroughly in the fridge overnight or for at least a few hours to firm up.
Step 4: Assemble the Cake
Here is where your creation starts to come together! Place one red velvet cake layer on your serving plate, generously frost it with cream cheese frosting, then lovingly add the chilled cheesecake layer on top. Crown it with the second red velvet layer, and coat the entire cake with the remaining cream cheese frosting. This layering ensures every forkful is rich, creamy, and perfectly balanced between chocolate, tang, and softness.
Step 5: Add the Finishing Touches
Warming the mixed berry jam with a splash of water and lemon juice until pourable transforms it into a glossy topping that you pour elegantly over the cake, allowing it to drip down the sides beautifully. Sprinkling dark chocolate chips and a handful of red velvet crumbs adds enticing textures and eye-catching color contrast, turning your cake into a piece of edible art.
How to Serve Irresistible Red Velvet Cheesecake Layer Cake to Wow Your Guests Recipe
Garnishes
Beyond the jam drizzle and chocolate chips, why not try fresh berries, edible flowers, or a dusting of cocoa powder to complement the layers? These simple additions elevate the cake’s presentation and invite guests to indulge with their eyes first.
Side Dishes
This cake pairs wonderfully with simple sides like lightly whipped cream, a scoop of vanilla bean ice cream, or even a citrusy sorbet to cut through the richness. For drinks, a bold coffee or a glass of sparkling wine makes the perfect pairing to enhance flavors.
Creative Ways to Present
Consider serving your cake in individual mini portions layered in clear glass jars for a modern twist. Or plate each slice with a berry coulis swirl and a sprinkle of crushed pistachios for added crunch and color. Presentation can really set your Irresistible Red Velvet Cheesecake Layer Cake to Wow Your Guests Recipe apart and make each serving feel extra special.
Make Ahead and Storage
Storing Leftovers
Once assembled, your cake should be refrigerated in an airtight container to maintain freshness and prevent the cream cheese frosting from drying out. Properly stored, it will keep well for up to 3-4 days, allowing you to savor every last bite.
Freezing
If you want to prepare this cake ahead of time, wrapping it tightly in plastic wrap and then a layer of aluminum foil before freezing is key. Frozen slices or the whole cake can last up to one month. Thaw overnight in the refrigerator before serving for best texture.
Reheating
This cake is best enjoyed chilled, so reheating is usually unnecessary. However, if you prefer a slightly softer texture, let slices sit at room temperature for 20-30 minutes before serving to bring the flavors alive.
FAQs
Can I make this recipe dairy-free?
Absolutely! Simply swap the cream cheese, butter, and heavy cream for plant-based alternatives like vegan cream cheese, coconut oil, and coconut cream. These substitutions keep the texture creamy and taste rich.
Is red gel food coloring necessary?
While liquid dyes can work, gel food coloring provides a more vibrant and stable red color without altering the batter’s consistency, making it the preferred choice for this recipe.
Can I use fresh berries instead of jam?
Fresh berries can be a lovely topping, but warming the berry jam adds a smooth, glossy finish that helps hold the decoration in place and infuses additional flavor into the cake’s exterior.
How do I prevent the cheesecake from cracking?
Baking at a lower temperature and avoiding overbaking helps keep the cheesecake smooth. Also, letting it cool gradually at room temperature before chilling reduces cracking risks.
Can I prepare parts of this cake in advance?
Yes! You can bake the cake layers and cheesecake a day ahead to save time. Assemble the cake on the day you plan to serve it for the freshest taste and best texture.
Final Thoughts
If you want to impress your family and friends with a dessert that is as stunning as it is delicious, you simply must try the Irresistible Red Velvet Cheesecake Layer Cake to Wow Your Guests Recipe. It’s a heartfelt creation that brings together everything wonderful about dessert: color, flavor, texture, and that special wow factor. Baking this cake is like sharing a warm hug in dessert form, and trust me, everyone will be asking for seconds!
Print
Irresistible Red Velvet Cheesecake Layer Cake to Wow Your Guests Recipe
- Prep Time: 40 minutes
- Cook Time: 1 hour 35 minutes
- Total Time: 2 hours 15 minutes (excluding chilling time)
- Yield: 12 servings
- Category: Dessert
- Method: Baking
- Cuisine: American
- Diet: Vegetarian
Description
This Irresistible Red Velvet Cheesecake Layer Cake combines rich, moist red velvet cake layers with a creamy, tangy cheesecake center. Topped with luscious cream cheese frosting and a mixed berry glaze, it is perfect for impressing guests at any celebration.
Ingredients
Crust
- 2 cups Chocolate Cookie Crumbs (can substitute with crushed graham crackers)
- 1/2 cup Unsalted Butter (melted; dairy-free alternatives for vegan option)
Red Velvet Cake Layers
- 2 cups All-Purpose Flour (gluten-free flour blend for gluten-free option)
- 1 cup Cocoa Powder (dark cocoa recommended)
- 1 teaspoon Baking Soda
- 1 teaspoon Baking Powder
- 1 teaspoon Salt
- 1.5 cups Granulated Sugar (brown sugar can be used for moisture)
- 1 cup Vegetable Oil (melted coconut oil for lighter texture)
- 2 large Eggs (flax eggs or applesauce as substitutes)
- 1 cup Buttermilk (regular milk with lemon juice or vinegar substitute)
- 1 tablespoon Vinegar (omit if using buttermilk)
- 2 teaspoons Vanilla Extract (pure extract recommended)
- 1 ounce Red Gel Food Coloring (avoid liquid dyes for color intensity)
Cheesecake Layer
- 16 ounces Cream Cheese (full-fat preferred)
- 2/3 cup Granulated Sugar (part of powdered sugar usage in frosting)
- 2 large Eggs (included in original frosting step)
- 1 teaspoon Vanilla Extract (for cheesecake batter)
- 1/2 cup Sour Cream (Greek yogurt substitute possible)
Cream Cheese Frosting
- 16 ounces Cream Cheese (full-fat, softened)
- 1 cup Heavy Cream (coconut cream for dairy-free)
- 2 cups Powdered Sugar
- 2 teaspoons Vanilla Extract
Decoration
- 1/2 cup Mixed Berry Jam (or other jams/fresh berries)
- 1/4 cup Water (to thin jam glaze)
- 1 teaspoon Lemon Juice (to brighten jam)
- 1/2 cup Dark Chocolate Chips
- 1/2 cup Red Velvet Crumbs (for garnish)
Instructions
- Prepare Crust: In a medium bowl, combine the chocolate cookie crumbs with melted butter until the mixture is crumbly. Press the crumbs evenly into the bottom of a 9-inch springform pan. Bake at 350°F (175°C) for 10 minutes to set the crust. Remove from oven and allow to cool completely.
- Make Red Velvet Cake Layers: Preheat oven to 350°F (175°C). Whisk together flour, cocoa powder, baking soda, baking powder, and salt in one bowl. In a separate large bowl, mix the sugar, vegetable oil, eggs, buttermilk, vinegar, vanilla extract, and red gel food coloring until fully combined. Gradually fold the dry ingredients into the wet ingredients until smooth. Divide batter evenly between two greased and lined round cake pans. Bake for 25 to 30 minutes or until a toothpick inserted comes out clean. Remove and cool completely on racks.
- Make Cheesecake Layer: In a large bowl, beat cream cheese and sugar together until smooth and creamy. Add eggs one at a time, beating well after each addition. Stir in vanilla extract and sour cream until fully incorporated. Pour cheesecake mixture over the cooled cookie crust in the springform pan. Bake at 325°F (160°C) for 40 to 45 minutes, or until the edges are set but the center slightly jiggles. Allow to cool at room temperature, then refrigerate until chilled and firm, at least 4 hours or overnight.
- Prepare Cream Cheese Frosting: Beat the softened cream cheese with powdered sugar and vanilla extract until smooth. Slowly add heavy cream while beating until the frosting reaches a spreadable consistency and holds soft peaks.
- Assemble Cake: Place one cooled red velvet cake layer on a serving plate. Evenly spread a layer of cream cheese frosting on top. Carefully place the chilled cheesecake layer onto the frosted red velvet layer. Top with the second red velvet cake layer. Frost the top and sides of the entire cake with the remaining cream cheese frosting.
- Decorate Cake: In a small saucepan, warm mixed berry jam with water and lemon juice over low heat until it becomes pourable but not too thin. Drizzle the jam glaze over the top of the frosted cake, letting it gently drip down the sides. Sprinkle dark chocolate chips and red velvet crumbs evenly over the top for a decorative finish.
Notes
- Use dark cocoa powder for a richer red velvet flavor and deeper color.
- For a vegan version, substitute eggs with flax eggs or applesauce and use dairy-free cream cheese and coconut cream.
- Chilling the cheesecake layer thoroughly before assembly helps prevent the frosting from melting.
- If gluten-free, opt for a trusted gluten-free flour blend and check all ingredients for gluten content.
- Allow the cake to come to room temperature before serving for best texture and flavor.


