
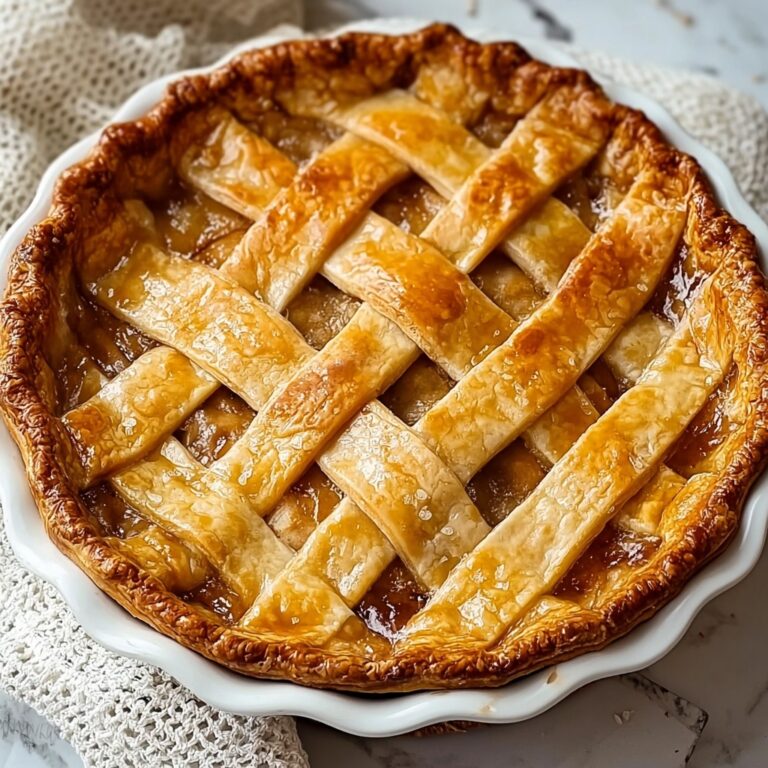
If you adore the rich, nutty flavor of pistachios and crave a dessert that feels both luxurious and comforting, you are going to fall head over heels for this Pistachio Cream Pie Recipe. This pie brings together a perfectly flaky crust with a velvety, homemade pistachio filling that outshines any boxed pudding version. Its beautiful pale green color and creamy texture make it a showstopper for special occasions or even a delightful treat for your next family dinner. Trust me, once you try this Pistachio Cream Pie Recipe, it’ll become one of your all-time favorites.
Ingredients You’ll Need
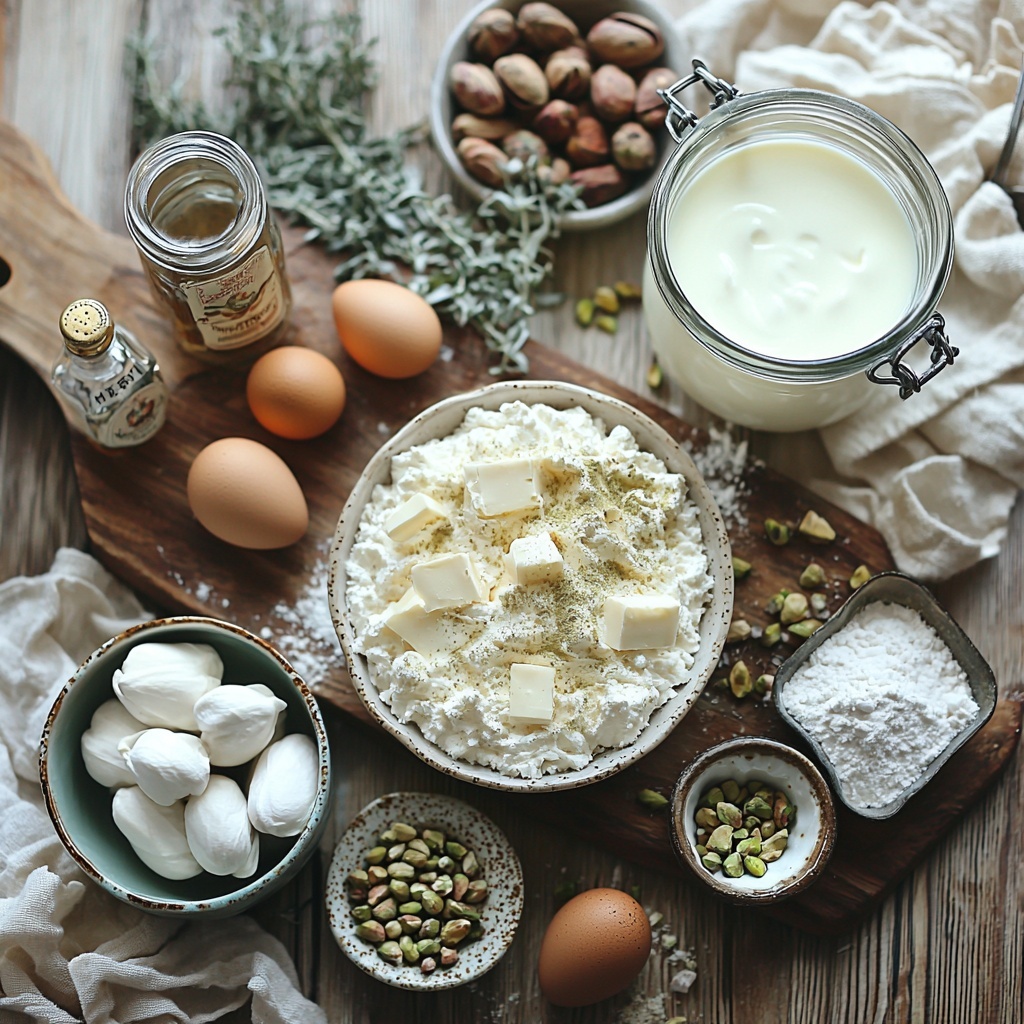
This Pistachio Cream Pie Recipe is surprisingly simple in terms of ingredients, but each one plays an essential role. From the flaky crust to the creamy, nutty filling, every element contributes to the perfect balance of texture, flavor, and that inviting look you’ll want to share with everyone.
- All-purpose flour: Creates the base of the pie crust, ensuring a tender, flaky texture.
- Sugar: A touch of sweetness in both crust and filling that balances the nutty pistachios.
- Salt: Enhances the overall flavors and deepens the pistachio taste.
- Unsalted butter: Cold and cubed for the crust, giving it richness and flakiness, and also used in the filling for smoothness.
- Ice water: Helps bring the crust dough together without warming the butter.
- Whole shelled pistachios (unsalted): The star ingredient, turned into a luscious paste that infuses the filling with natural pistachio flavor.
- Cornstarch: Acts as a thickening agent for the filling, giving it that creamy, pudding-like consistency.
- Whole milk: Provides a rich, creamy base for the filling’s custard texture.
- Egg yolks: Lightly beaten to create a silky, thickened filling when cooked with the milk and pistachio paste.
- Pure vanilla extract: Adds warmth and depth to the flavor profile.
- Almond extract (optional): A subtle complement to pistachios for extra aromatic nuttiness.
- Heavy whipping cream: Cold and whipped into clouds of sweetness for the topping.
- Powdered sugar: Sweetens the whipped cream topping without grittiness.
- Chopped pistachios (optional garnish): Adds texture and a pop of vibrant green color on top.
How to Make Pistachio Cream Pie Recipe
Step 1: Make the Pie Crust
Start by whisking together the flour, sugar, and salt to create a balanced base for the crust. Then, cut in the cold butter until the mixture resembles coarse crumbs—this is the secret to a flaky crust. Gradually add ice water to bring the dough together without melting the butter. Chill the dough so it holds its shape when rolled. Once rolled and transferred to the pie plate, bake until the crust turns a lovely light golden brown. Cooling completely here ensures the filling won’t melt the crust later on.
Step 2: Prepare the Pistachio Paste
The real magic of this Pistachio Cream Pie Recipe starts with grinding the whole pistachios into a smooth, oily paste. This homemade pistachio butter has a richer and more authentic flavor than store-bought alternatives. As it turns creamy in your food processor, your kitchen will fill with that irresistible nutty aroma that means you’re on the right track.
Step 3: Cook the Pistachio Filling
In a saucepan, whisk sugar, cornstarch, and salt before gradually blending in the milk for a smooth base. Warm the mixture while stirring constantly until it starts to thicken—patience here pays off. Temper the egg yolks carefully by slowly whisking some of the hot milk in, then returning the mix to the pot. Continue cooking until silky and glossy, then whisk in your pistachio paste, butter, and extracts for a deeply flavored, creamy filling. For the smoothest finish, strain the mixture through a sieve before pouring it into your cooled crust.
Step 4: Chill the Pie
To get that perfect set without any pesky skin forming on top, cover the pie with plastic wrap pressed right down to the surface of the filling. Refrigerate for at least 4 hours so the luscious pistachio cream firms up beautifully, making it easy to slice and utterly delightful to eat.
Step 5: Make the Whipped Topping
Whip cold heavy cream together with powdered sugar and vanilla until soft peaks appear. This whipped topping adds a dreamy lightness that perfectly balances the richness of the filling. Spread it gently over the chilled pistachio cream for a gorgeous finishing touch.
Step 6: Garnish and Serve
Sprinkle chopped pistachios over the whipped cream for a delightful crunch and a vivid splash of green. Slice and serve this beauty chilled to maximize that creamy texture and fresh nutty flavor.
How to Serve Pistachio Cream Pie Recipe
Garnishes
Chopped pistachios are the classic topping, adding texture and highlighting the nutty theme, but you can also consider edible flowers or a light dusting of powdered sugar for a special occasion. Fresh mint leaves create a refreshing contrast, and a drizzle of white chocolate complements the pistachios beautifully.
Side Dishes
This pistachio cream pie is rich enough to stand on its own, but pairing it with a fresh berry salad or a citrusy sorbet adds a lovely brightness on the side. A cup of strong coffee or a delicate herbal tea like chamomile can also be the perfect companion for each slice.
Creative Ways to Present
For a fun twist on the Pistachio Cream Pie Recipe, serve it in individual glass cups topped with whipped cream and pistachio crumble for an elegant, fuss-free dessert. Or use mini tart shells to make bite-sized versions—perfect for parties! Another idea is to layer it with crushed pistachio cookies and whipped cream in a trifle dish for a stunning presentation.
Make Ahead and Storage
Storing Leftovers
After enjoying your Pistachio Cream Pie Recipe, cover any leftover slices tightly with plastic wrap or place them in an airtight container. Store them in the refrigerator where they will keep fresh for up to 3 days, maintaining the pie’s creamy texture and vibrant pistachio flavor.
Freezing
If you want to make the Pistachio Cream Pie Recipe ahead of time or save some for later, freezing is possible but with a caveat: the texture of the creamy filling may change slightly. Wrap the pie tightly in plastic wrap and then foil before freezing. Thaw overnight in the fridge before serving and add fresh whipped cream to refresh the topping.
Reheating
This pie is best served chilled, so reheating is not recommended. However, if you prefer the crust to be a little softer, let the slice sit at room temperature for about 15 minutes before serving to take the chill off without melting the filling.
FAQs
Can I use pre-made pistachio paste?
While you can use store-bought pistachio paste, making your own by grinding raw pistachios will give this Pistachio Cream Pie Recipe a far fresher, richer, and more authentic flavor that’s well worth the extra effort.
Is it necessary to temper the egg yolks?
Yes, tempering the egg yolks prevents them from scrambling when added to the hot milk mixture, ensuring a smooth, creamy filling. It’s a simple step that guarantees the perfect texture.
Can I make this pie gluten-free?
Absolutely! Substitute the all-purpose flour in the crust with a gluten-free flour blend designed for baking. Just be sure to follow the package instructions for measurements and chilling times as they may vary.
What can I use instead of heavy whipping cream for the topping?
If you want a lighter option, try whipped coconut cream—it whips up beautifully and adds a subtle coconut flavor that pairs nicely with pistachios. Just chill the coconut cream overnight before whipping.
How long can I prepare the Pistachio Cream Pie Recipe in advance?
You can prepare and assemble the entire pie up to 24 hours ahead of time. Keeping it refrigerated allows the flavors to meld and the filling to set perfectly, so it’s ready whenever you want to impress your guests.
Final Thoughts
Making this Pistachio Cream Pie Recipe is like giving yourself a delicious gift, filled with rich, nutty flavors and a creamy texture that feels downright indulgent. It’s a dessert that feels special yet is surprisingly easy to make at home, perfect for sharing or savoring all by yourself. I can’t wait for you to try it and see how this humble pie transforms into something truly memorable.
Print
Delicious Recipe
- Prep Time: 45 minutes
- Cook Time: 25 minutes
- Total Time: 5 hours 10 minutes
- Yield: 8 servings
- Category: Dessert
- Method: Baking
- Cuisine: American
- Diet: Vegetarian
Description
Pistachio Cream Pie is a luscious homemade dessert featuring a buttery flaky crust filled with a rich, creamy pistachio custard made from real shelled pistachios. Topped with whipped cream and a scatter of chopped pistachios, it offers a delicate, nutty flavor and elegant pale green color. This pie is ideal for festive occasions, family gatherings, or any moment when you crave a sophisticated sweet treat.
Ingredients
For the Pie Crust
- 1 1/4 cups all-purpose flour
- 2 tablespoons sugar
- 1/4 teaspoon salt
- 1/2 cup (1 stick) unsalted butter, cold and cut into cubes
- 2–3 tablespoons ice water
For the Pistachio Filling
- 1 1/2 cups whole shelled pistachios (unsalted)
- 1/2 cup sugar
- 1/4 cup cornstarch
- Pinch of salt
- 2 cups whole milk
- 3 large egg yolks, lightly beaten
- 2 tablespoons unsalted butter
- 1 teaspoon pure vanilla extract
- Optional: 1/2 teaspoon almond extract
For the Topping
- 1 cup heavy whipping cream, cold
- 2 tablespoons powdered sugar
- 1/2 teaspoon vanilla extract
- Optional garnish: chopped pistachios
Instructions
- Make the Pie Crust: In a large bowl, whisk together the flour, sugar, and salt. Add cold cubed butter and mix with a pastry cutter or your fingers until the mixture resembles coarse crumbs. Add ice water one tablespoon at a time, mixing until the dough begins to come together. Form the dough into a disk, wrap in plastic wrap, and chill for at least 30 minutes. Roll the dough on a floured surface to fit your pie dish, transfer to pie plate, trim edges, chill again for 15 minutes, then bake at 375°F (190°C) for 15–18 minutes until lightly golden. Let cool completely.
- Prepare the Pistachio Paste: Place shelled pistachios in a food processor and process until they break down into a coarse meal, then continue processing until they release oils and form a smooth, thick pistachio butter paste. Set aside.
- Cook the Pistachio Filling: In a medium saucepan, whisk together sugar, cornstarch, and salt. Gradually whisk in the milk until smooth. Cook over medium heat, stirring constantly, until thickened. Temper the egg yolks by slowly whisking about half the hot mixture into them, then pour back into the saucepan. Continue cooking and stirring until pudding is very thick and glossy. Remove from heat and stir in pistachio paste, butter, vanilla extract, and almond extract if using. Optionally strain mixture for a smoother filling. Pour warm filling into cooled pie crust.
- Chill the Pie: Cover the pie with plastic wrap pressed directly on the surface to prevent skin formation. Refrigerate for at least 4 hours until the filling is fully set.
- Make the Whipped Topping: In a chilled bowl, whip cold heavy cream with powdered sugar and vanilla extract using a hand mixer or whisk until soft peaks form. Spread the whipped cream over the chilled pistachio filling.
- Garnish and Serve: Sprinkle chopped pistachios over the whipped cream for added texture and color. Slice and serve chilled.
Notes
- For best results, use unsalted pistachios and butter to control salt levels.
- Chilling the dough before baking ensures a flaky crust.
- Tempering the egg yolks prevents curdling and creates a smooth custard.
- Straining the filling is optional but results in a silky texture.
- Store leftovers covered in the refrigerator for up to 3 days.

